1

Strawberry Cream Cake

This cake layered with fresh whipped cream with a touch of rose water and lots of strawberry is a dream…each bite is loaded with soft and cottony cake with a fruity layer of cream.

Since I came with the idea of this cake, I already made this cake 4 times, yes four times and trust me, every time I get compliments of it looks and taste…this will be my potluck favorite dessert to take.

– Why you should make this cake?

Because is super, I repeat super easy and tastes so good.

– Can I make this cake in advance?

Yes, you can make the cake and store in the refrigerator for a couple of days and make the fresh whipped cream with strawberry one day or on the day you are serving.

– What is the secret?

Cake is baked in a tray as for cake roll…it takes less time to bake and literally no mess as there is no need to slice the cake horizontally, which never comes straight…you just need to measure the length of the cake once out of the pan and divide by 3 for the layers.

– Can I use other fruits?

Absolutely, you can use blueberry, kiwi, or a mix of fruits.

– Should we look at the recipe?

Ingredients:

Cake batter

  • 4 large eggs separated (make sure the bowl with egg white does not contain any trace of grease)
  • 60 g vegetable oil (I used sunflower)
  • 40 g milk
  • 1 teaspoon vanilla extract
  • 80 g cake flour
  • 1 pinch salt
  • 8 g white vinegar
  • 80 g sugar

Strawberry Whipped cream

  • 300 g heavy whipping cream
  • 35 g sugar
  • 1 ½ teaspoons rose water (optional)
  • 700 g (1 ½ – 2 lb) strawberries or fruit of your preference, feel free to add more.

Method:

Cake Layer

Preheat oven at 275oF.  Line a 9 x 13 inch (23 x 33 cm) jelly pan with parchment paper.

In a small bowl, mix cake flour with salt., and set aside.

In a medium bowl, stir together egg yolks, oil, milk, vanilla extract. Add the sifted mix of cake flour and salt to the egg yolk mixture. Mix well until smooth and all the flour is well incorporated, resembling a pancake mix batter.

In a large bowl of a hand-held mixer or stand mixer whisk the egg white with the vinegar until large bubbles form. Add the sugar slowly into thirds. Whisk until medium/firm peaks form. Do not over beat, the meringue should be shiny and form soft but firm peaks.

Add about ⅓ of the meringue to the egg yolk mixture and mix gently until all the egg white is incorporated to the batter.

Pour the egg yolk mix to the remaining meringue and fold gently until all the egg white is combined to the batter.

Pour the batter into the prepared baking sheet and spread evenly. Gently tap the pan against the counter to remove excess of air bubbles. Bake at for 18-20 minutes or until a toothpick inserted in the middle of the cake comes out clean.

Remove cake from the oven and transfer it with its parchment paper onto a wire rack and let it cool.

Flip the cake to another piece of parchment paper of silicone mat.

Peel the parchment paper from the cake. Cut the cake into 3 equally portions and set aside.

Strawberry Whipped Cream

Cut approximately 500 g (1 lb) of strawberry into small pieces and set aside.

Make the whipped cream by placing the cold heavy cream in a cold bowl. I often put my bowl into an ice water bath. Add the sugar and rose water, if using and whip on medium-high speed until lots of air are incorporated into the cream.

Whip until the cream achieve soft peak to medium peaks, check constantly by stopping the mixer so the cream does not over mix.

Once the cream is whipped, add the strawberry into the cream and mix gently.

Assembly:

Alternate layers of cake and cream and finish by covering the whole cake with the cream.

Use the remaining strawberry do decorate the cake.

Refrigerate the cake for a couple of hours and serve cold.

– Care for  more cake recipe? Check these out…

Thank you for visiting Color Your Recipes…have a colorful week!


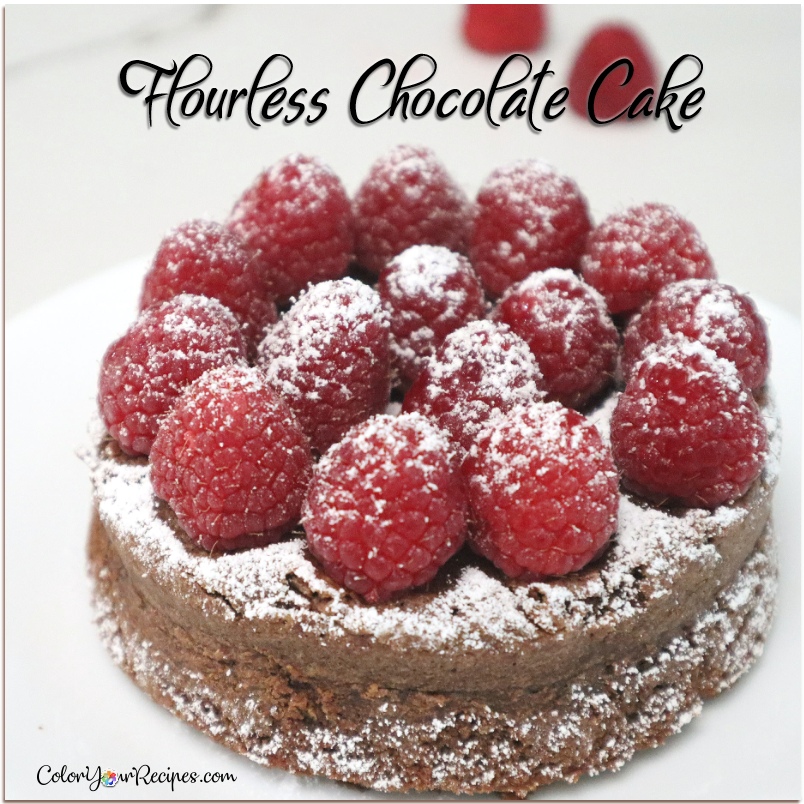
Flourless Chocolate Cake

This cake is decadent…made mainly with almond meal and dark chocolate, super rich, moist almost like brownie.

I have made chocolate cake using almond flour with a little bit of flour, but this one is totally flourless, and the texture is just heaven…it melts away…The cake is super rich, moist, and kind of between fudge and brownie. Since it is super rich a small slice goes a long way…and so satisfying.

This recipe was adapted from Food 52 with minor adjustment.  As always, I like my dessert a bit less sweet than the original recipes, and as usual I try to make it practical. According to the site this cake is called Torta Caprese, from the Island of Capri.

– How the cake rises without flour?

Egg whites are whipped until soft peaks which are added to the cake batter to leaven it.

– What else can I add to the cake?

Oh…you can add all kind of flavors, orange zest, a shot of strong coffee, rum or Grand Marnier…many choices for you to pick.

– How can I serve this cake?

The cake really tastes better the next day…and you can serve with a dollop of whipped cream, chocolate ganache, fresh berries, crème anglaise…depends of your palate and what you have in the refrigerator.

– Can I freeze the cake?

Absolutely, once the cake is cooled, wrap in plastic unfrosted and freezer. Before serving let it defrost in the refrigerator overnight.I think it is time to look at the recipe…

– I think it is time to look at the recipe…

I used 2 small round pans for this recipe (4 ½ and 6 in), but feel free to use one 8 in round pan.

Ingredients:

  • 125 g almond flour
  • 125 g dark chocolate
  • 113.4 g (4 oz) butter, 1 stick
  • 100 g sugar
  • 3 large eggs separated
  • 1 tablespoon rum (optional)
  • Powdered sugar
  • Fresh raspberry for garnish

Method:

Preheat oven to 325ºF and set a rack on the middle level.

Line the bottom of the pans (4 ½ and 6 inch) or pan (8 inch) with a circle of parchment paper and around it.

In a glass bowl on the top of a double boiler or a pot of simmering water add the chocolate until melted. Remove from the heat and add the butter. Mix until all combined, if need place the bowl back to the double boiler to melt the remaining butter.

Add to the chocolate mixture the almond flour, sugar. Mix until all combined. Once the mixture cools down add the egg yolk and the rum or any other ingredients you might add. Stir well and set aside.

In a clean bowl, beat the egg whites they form soft peaks. In three additions, fold the egg whites into the chocolate mixture.

Pour the batter into the prepared cake pan(s) and smooth the top. and bake for 20 minutes (4 ½ inch cake pan) and for 30 minutes (6 inch cake pan) or 40 minutes (8 inch cake pan), depending on the size of your cake pan or until a toothpick inserted in the center comes out with a few moist crumbs. Do not overbake.

Let cool completely on the rack before removing the cake from the pan.

Serve as you wish, with confectioner’s sugar, fresh berries, a dollop of whipped cream and so on…

– If you enjoy this simple and easy chocolate cake you might want to try the following…

Did you know that dark chocolate is rich in flavanols? Observational studies linked the benefits of the cocoa flavanols with reduced blood pressure, consequently reducing the risk of heart disease. One must be cautious to not over consume dark chocolate as it contain high calories and sugar.
Thank you for visiting Color Your Recipes…have a colorful week!


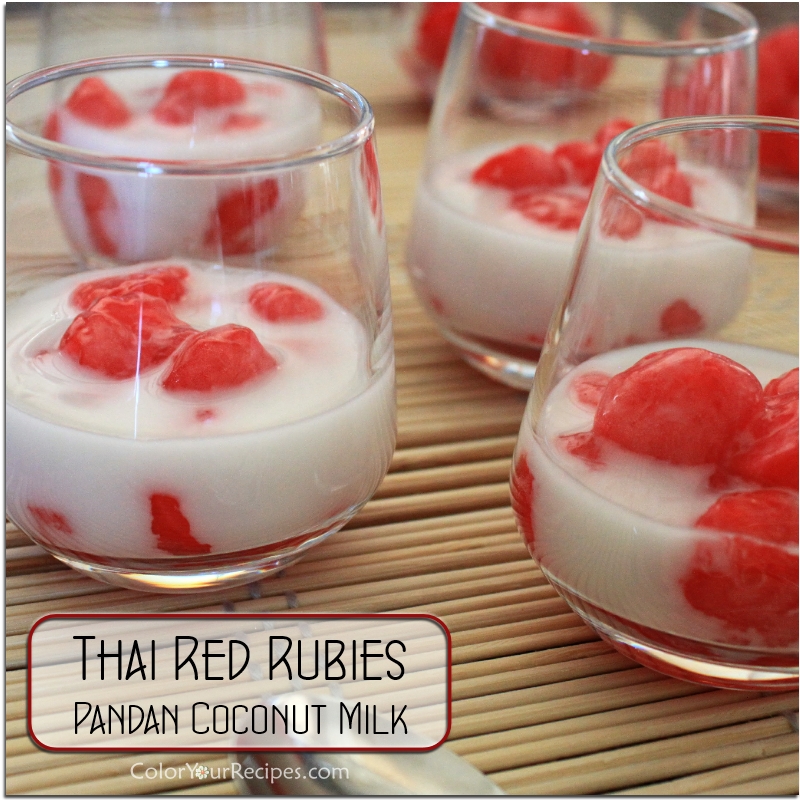
Thai Red Rubies in Pandan Coconut Milk

It is Valentine’s Day…these rubies are not to wear, but are packed with great textures, from crunchy to chewy…

Have you ever tried these Thai red “rubies”? The first time I had these “gems” was in an Asian specialty drink store…and I just felt in love with it…they are actually small pieces of water chestnuts colored in red and coated with tapioca flour…resulting in crunchy and chewy texture…I know it is hard to imagine that these little gems carry so many textures.

Another great combination is pandan with coconut milk…pandan is very popular in Southeast Asia, often used in desserts and aromatized rice dishes. If you are not familiar with pandan, you should try, as pandan leaves have a very exotic fragrance. By the way, I was able to find from leaves in Asian grocery.

Honestly I was not very fond of adding red food coloring, therefore next time making these gems I will try to use beet juice…

Ingredients:

  • ½ can coconut milk
  • 2 to 3 pandan leaves or to taste
  • 1 ½ to 2 tablespoons sugar
  • Pinch salt
  • 1 can of whole water chestnut, 8oz
  • ½ teaspoon red food coloring
  • ¼ cup water
  • ½ cup tapioca flour

Method:

Pandan coconut milk

Place the coconut milk in a small pan, add salt and sugar. Heat under medium heat, when the milk is about to boil, turn the heat to simmer and add the pandan leaves, let it simmer for about 5 to 10 minutes.

Remove from the heat and let it cool, and place in the refrigerator to chill.

Red rubies

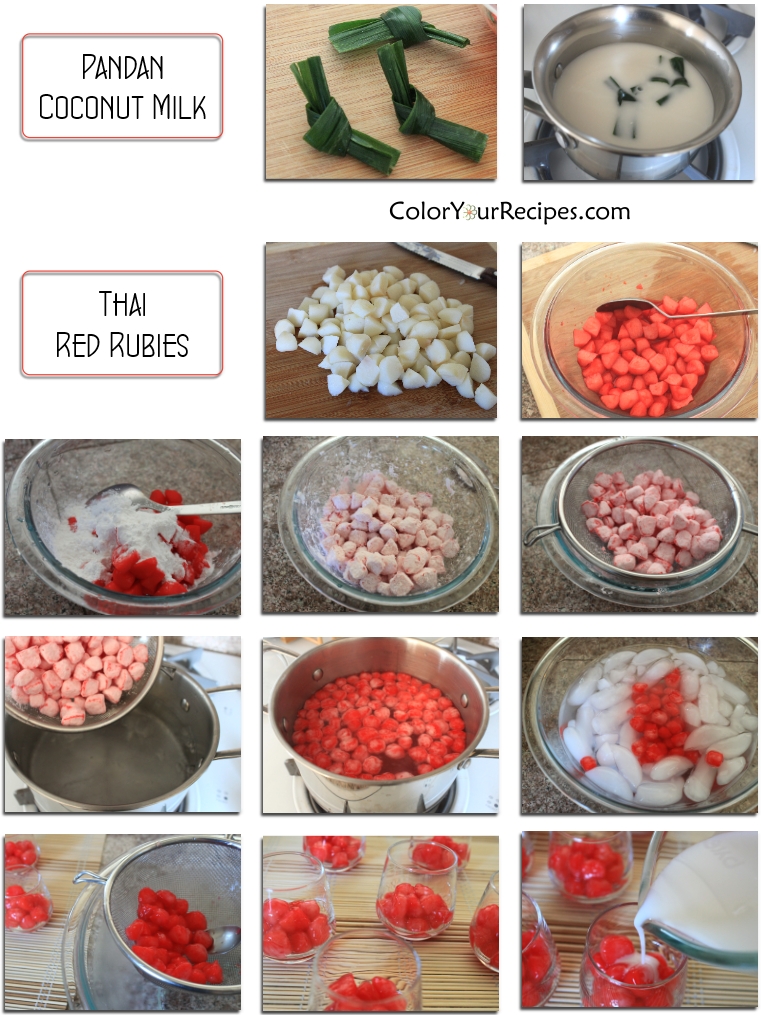
Drain the water chestnut and rinse. Cut them into small bite size pieces (about 6 pieces each chestnut).

In a small bowl add the red food coloring to the water and soak the water chestnuts for about 15 minutes.

Once the water chestnuts are colored, drain the colored red water.

Place the “rubies” in a bowl and toss the tapioca flour to coat, make sure that all the “rubies” are well coated with tapioca flour.

Remove the excess of tapioca flour by placing the coated “rubies” into a strainer.

In a medium pot, boil about 4 to 5 cups of water. When boiling, place the coated “rubies” in, and cook for a few minutes until they float. Scoop the “rubies” in a strainer and place them in ice water.

Assembly

Remove the “rubies” from the ice water and scoop the desired amount into small serving cups. Add the pandan coconut milk as you like and serve icy cold.

Note:If you like a thicker layer of chewy tapioca, spray water on the already coated “rubies” and coat them again with more tapioca flour…

I hope you enjoy this colorful and fun dessert inspired by Thai cuisine.

Did you know that water chestnuts is not a nut? Water chestnuts are aquatic vegetables, meaning that they grow under the water in marshes. Water chestnuts are low in calories and rich in dietary fiber and have good amounts of vitamins and minerals.

Thank you for visiting Color Your Recipes…have a colorful week!


Chocolate Fudge Cake

This is a fun and yet delicious fudge chocolate cake recipe. It is rich, moist and perfect for Valentine’s Day or anytime you crave for chocolate.

How about this almost individual chocolate fudge cake for Valentine’s Day celebration? This is a very easy and simple recipe which was adapted from Liz at That Skinny Chick Can Bake…when I saw this cake on her I knew I had to bake it…although the cake has a dense texture it is moist…and yes, very easy to put together as Liz mention.

I used 2 small pans, round and heart shape, both 5-inch…of course you can use a bigger pan and double the recipe…as it is on the original recipe.

Ingredients:

Chocolate Cake

  • ½ cup all-purpose flour
  • 3 tablespoons unsweetened cocoa powder
  • ¼ teaspoon baking soda
  • Pinch salt
  • ¼ cup butter, melted and warm
  • ⅓ cups brown sugar
  • 1 egg
  • ½ teaspoon vanilla
  • ¼ cup hot water

Ganache

  • 4 ounces semisweet chocolate, finely chopped
  • ½ cup heavy cream
  • ½ tablespoon sugar

Garnishes

  • Confectioner’s sugar
  • Fresh strawberries or raspberries

Method:

Chocolate Cake

Preheat the oven to 350F. Grease the bottom of 2 5-inch round cake or heart shape or line it with parchment.

In a small bowl, shift flour, baking soda, salt and cocoa, whisk to combine. In a medium bowl, combine the melted butter and brown sugar, add the egg and vanilla. Stir until well blended. Add the flour mixture all at once and stir just until all the flour is moistened.

Pour the hot water over the batter, stir just gently until batter is smooth, do not over mix.

Pour the batter into the prepared pans. Bake about 20 minutes or until a toothpick inserted into center of cake comes out clean.

Cool on rack for 5 to 10 minutes. Rremove from pan and let the cakes cool on the wire rack, remove the parchment if used.

Ganache

Place the chocolate in a small heatproof bowl. In a small saucepan or small bowl if using microwave, heat cream to a simmer.

Pour the hot cream over the chocolate and stir gently until the chocolate is completely melted and smooth. Add sugar and whisk to combine.

Cake Assembly

Pour the warm ganache over the cake and use a spatula to spread it from the top of the cake and down to the sides. Make sure the ganache is set before dusting the cake with confectioner’s sugar and garnishing with strawberries or raspberries.

If you enjoy this simple chocolate cake you might want to try the Chocolate Buttermilk Cake recipe.

Thank you for visiting Color Your Recipes…have a colorful week!


Cherry Ice Cream

The ice cream is rich, creamy and loaded with cherries. The recipe calls for cherry cooked in brandy sauce, very easy and delicious.

Can you believe that this is my first homemade ice cream? I have made a variety of frozen yogurt but this time I decided to go for the “real” ice cream, with heavy cream and all…for the Valentine’s Day.

When I saw cherries at the local grocery store, I just thought that cherry ice cream would be nice…especially with its intense and vivid red color accompanied with brandy flavor.

The most laborious part of this recipe is to remove the cherry pit…which with the help of a cherry pitter it was not that bad.

The texture of this ice cream without a doubt was creamier than the brandied cherry frozen yogurt which was made with fat free yogurt, after all the “fat” in heavy cream had to play a role…

Ingredients:

Brandied Cherry

  • 2 lbs of cherries (pit removed)
  • 2/3 cup sugar
  • 1 cup brandy

Ice Cream

  • 2 cups heavy cream
  • ½ cup whole milk
  • 1/3 cup sugar
  • ½ teaspoon vanilla extract
  • 2 tablespoon brandy (optional)
  • 2 cups of brandied cherry

Method:

Make sure that your ice cream maker bucket is in the freezer overnight before you start the process.

Place in a medium pan the cherries, sugar and brandy. Cook over high heat until boiling point, then lower the heat to medium low and continue to cook for approximately 12 minutes until the cherries are slightly soft, and still somehow whole (not mushy) and syrupy.

Remove the brandied cherries from the heat, let it cool and place in the refrigerator for a few hours or overnight.

In a medium bowl, mix the heavy cream, milk, sugar, vanilla extract, brandied cherry and brandy (if you decide to use). Once the cherry and the heavy cream mixture are all well blended turn on the ice cream maker and pour the heavy cream mix into the frozen bucket.

Churn until the mixture is creamy for about 10 to 15 minutes depending on your ice cream maker.

Serve immediately or place in the freezer in an airtight container.

If placed in the freezer, remove the ice cream 10 to 15 minutes before serving.

I hope you enjoy this simple ice cream recipe. If you care for healthy versions of frozen desserts, you might want to check on Avocado Ice Cream, Mango Frozen Yogurt or Rhubarb Frozen Yogurt recipes.

Have a wonderful week and thank you so much for visiting Color Your Recipes!


Jelly Shots

I have been under some stress lately and really was not in the mood for baking…but did want to do something easy and cute for Valentine’s Day. Besides we were having a family gathering to celebrate the Chinese New Year at my mom’s. I ended up making cheese balls and these jelly shots. I got the idea from Basic Jello Shots Recipe. Honestly, this is the first time that I tasted jelly shots…after a while testing the optimal ratio concentration of vodka and juice I almost forgot about my distress…but please, do not add any vodka if you plan to serve this jelly to kids…I made two batches, one for the adult taste and the other one for the kids.

The ratio of juice and vodka or distilled spirit is up to your discretion and I will not judge you for that…I decided to go with 1 part of vodka with 3 parts of juice.

This jelly shots were a lot of fun! Next time, instead of using flavored red color gelatin, I will use fresh fruit like strawberries, raspberries, pineapple…the kids love it!

Before I forget…

Happy Chinese New Year to all of you that celebrate!
Now, back to the recipe…

Ingredients:

Red color flavored gelatin of your preference, 3 oz
Any light color juice, I used Trader’s Joe White grape at least 16 oz
2 envelopes of Knox gelatin, unflavored
Vodka, flavored vodka or any other distilled spirit

Method:

For the red color gelatin, follow the instruction described on the box of the gelatin and refrigerate in a square or rectangular container, with approximately ¼ inch depth. Refrigerate for at least 2 hours or overnight.

Two hours later or next day, prepare the juice gelatin.

Pour approximately 4 oz of the juice of your preference in a bowl and sprinkle the unflavored gelatin over the juice and let it stand a minute or so, until all the gelatin has been absorbed by the juice.

Heat up the remaining juice, pour the hot juice over the gelatin and stir until is completely dissolved. The liquid should be clear without any particles.

In case you prefer to add vodka, replace juice with whatever amount of vodka or distilled spirit of your preference. I added 12 oz of juice and 4 oz of pear flavored vodka.

Set the juice gelatin until totally cold. In the meantime, remove the flavored red gelatin and place in a warm water bath to release the gelatin from the container. Flip the gelatin into a flat surface and with the help of a cookie cutter, cut the gelatin and gently place the red gelatin molds into a container that you want your final gelatin.

Once you finish all the cutting, gently pour the cold juice gelatin over the mold and refrigerate for at least two hours or overnight.

To serve, place the gelatin in a warm water bath, and flip on a plate.

Serve cold.

Did you know that some scientists claim that gelatin can promote joint health? Moreover, there are some scientific evidences that gelatin taken orally can benefit fingernail and even prevent hair loss in men and women.


Thank you for stopping by Color Your Recipes…have a colorful week!


Soft Cheesecake with Strawberry Sauce

I hope you all had a great weekend…since tomorrow is Valentine’s Day I thought that this simple recipe of cheesecake decorated with bright red strawberry sauce would be appropriate for the occasion.

The cheesecake is very light when compared to the classic cheesecake. In a way it is between a cheesecake and a chiffon cake. This cottony cheesecake was adapted from Alex Goh’s recipe from Passionate About Baking.

Ingredients:

Cheesecake

1/3 cup sugar
3 eggs separated
1 ½ tablespoon butter
4 oz. cream cheese
1/3 cup milk
1 tablespoon lemon juice
5 tablespoon cake flour
2 ½ tablespoon cornstarch
½ teaspoon vanilla extract
pinch salt
pinch cream of tartar

Strawberry Sauce

1 lb fresh strawberry
3 tablespoon sugar
2 tablespoon water
½ lemon zest
½ tablespoon cornstarch dissolved in ½ tablespoon water

Method:

Cheesecake

Preheat oven to 325F
Melt cream cheese, butter and milk over a double boiler. Cool the mixture. Fold in the flour, the corn starch, egg yolks, vanilla extract, lemon juice, pinch of salt and mix well.

Whisk egg whites with cream of tartar until foamy. Add in the sugar and whisk until soft peaks form.

Add the cheese mixture to the egg white by folding gently and not deflating the egg white. Pour into a cake pan lightly greased and floured.

Bake cheesecake in a water bath for 1 hour and 10 minutes or until set and golden brown at 325F.

Strawberry Sauce

In a sauce pan place the strawberries and all the listed ingredients, first in high heat until starts to boil, then turn the heat to low and let is cook until the strawberries are soft and the sauce is reduced.

Add the corn starch diluted in water to the strawberries and continue mixing until the sauce turns thick.

Let it cool before serving with the cheesecake.

I hope you enjoy this simple recipes for a very light and yet tasty cheesecake and …

You might want to check out the vanilla chiffon cake with lemon curd or the meringue kisses cookies, they are perfect for Valentine’s Day!

Thank you for stopping by Simple Recipes and have a great week ahead!


Meringue Kisses Cookies

This is a very simple recipe which gives you beautiful colors of cookies. These cookies are very light and non fat. I adapted this recipe from Desserts Magazine, December issues of cookies. In the original recipe raspberry Jell-O was used, I decided to make two tones of colored cookies, strawberry and lime. These meringue cookies taste so good… mainly because of the Jell-O flavor. It is not too sweet and slightly tart, you cannot stop eating them. It is sure a favorite among the kids and adults.

Ingredients:

Lime Meringue Kisses Cookies
3 large egg whites
1⁄8 teaspoon salt
1 package (3 oz) lime Jell-O
1/3 cup fine granulated white sugar
1 teaspoon pure vanilla extract

Strawberry Meringue Kisses Cookies
3 large egg whites
1⁄8 teaspoon salt
1 package (3 oz) strawberry Jell-O
1/3 cup fine granulated white sugar
1 teaspoon pure vanilla extract

Method:

Position one oven rack in the top third of the oven and the other rack on the bottom third of the oven. Preheat the oven to 275°F.

Line 2 baking sheets with parchment paper.

Place the egg whites and salt in a large bowl beat using medium speed until frothy , about 30 seconds. Turn the speed to high and pour the Jell-O and the sugar into the bowl in a slow, steady stream. Continue to beat until the egg whites are stiff and shiny, about 5 minutes.

Using a rubber spatula, gently fold in the vanilla. Place the meringue into a pastry bag fitted with a very large plain or star tip and pipe the cookies, each about 1V inches in diameter, onto the baking sheets.

Bake the meringues until they are firm on the outside but still soft on the inside, about 30 minutes. Remove the cookies from the parchment sheet and place on a wire rack and let them cool. These cookies can be stored in airtight container at room temperature for 1 week.

Happy Valentine’s Day!


Did you know that whipped egg whites are more stable when cream of tartar is added to the whites? Moreover, cream of tartar serves as a binding agent and helps to denature the protein in the eggs whites in order to form firm peaks.

Thank you for stopping by Simple Recipes and have a great week!


Grilled Chicken with Pineapple

As I mention last week, for this grilled chicken I used some of the juice from the pineapple cheesecake to marinate these chicken breasts. The grilled chicken breast are very tender due to the pineapple juice which contain enzymes that break the protein in chicken, therefore tenderize the chicken and gives them a nice flavor as well.

Ingredients:

3 chicken breasts split in half
3~4 cloves garlic mince
½ cup pineapple juice
1 tablespoon sesame oil
1 tablespoon soy sauce
Parsley finely chopped
Salt and pepper to taste

Method:

Add all the above ingredients to the chicken breast and refrigerate for at least 2 hours.

Grill the chicken breast and serve hot.

Thank you for stopping by Simple Recipes and have a great week!