1

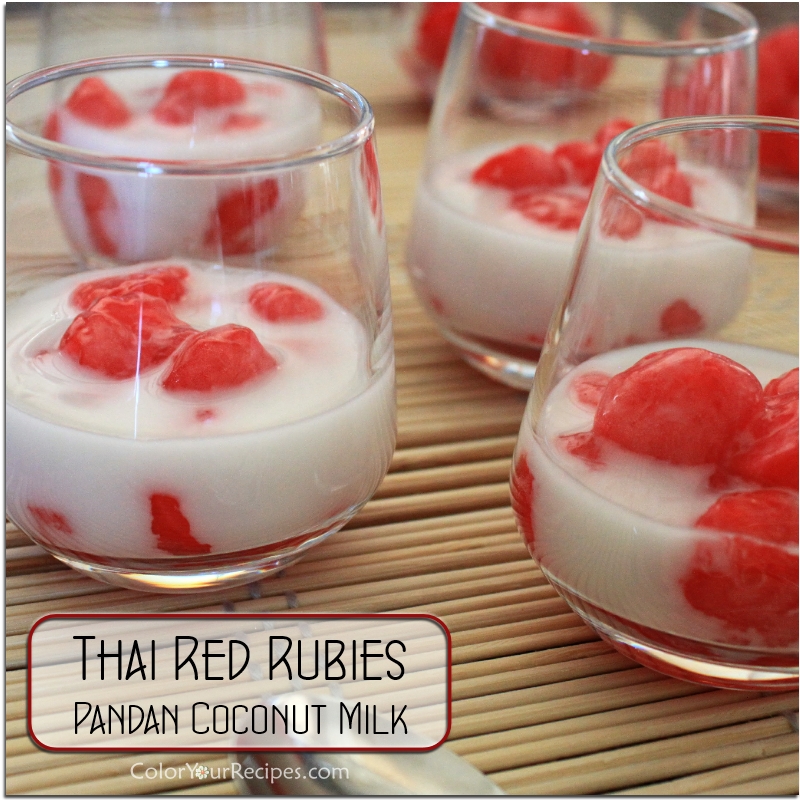
Thai Red Rubies in Pandan Coconut Milk

It is Valentine’s Day…these rubies are not to wear, but are packed with great textures, from crunchy to chewy…

Have you ever tried these Thai red “rubies”? The first time I had these “gems” was in an Asian specialty drink store…and I just felt in love with it…they are actually small pieces of water chestnuts colored in red and coated with tapioca flour…resulting in crunchy and chewy texture…I know it is hard to imagine that these little gems carry so many textures.

Another great combination is pandan with coconut milk…pandan is very popular in Southeast Asia, often used in desserts and aromatized rice dishes. If you are not familiar with pandan, you should try, as pandan leaves have a very exotic fragrance. By the way, I was able to find from leaves in Asian grocery.

Honestly I was not very fond of adding red food coloring, therefore next time making these gems I will try to use beet juice…

Ingredients:

  • ½ can coconut milk
  • 2 to 3 pandan leaves or to taste
  • 1 ½ to 2 tablespoons sugar
  • Pinch salt
  • 1 can of whole water chestnut, 8oz
  • ½ teaspoon red food coloring
  • ¼ cup water
  • ½ cup tapioca flour

Method:

Pandan coconut milk

Place the coconut milk in a small pan, add salt and sugar. Heat under medium heat, when the milk is about to boil, turn the heat to simmer and add the pandan leaves, let it simmer for about 5 to 10 minutes.

Remove from the heat and let it cool, and place in the refrigerator to chill.
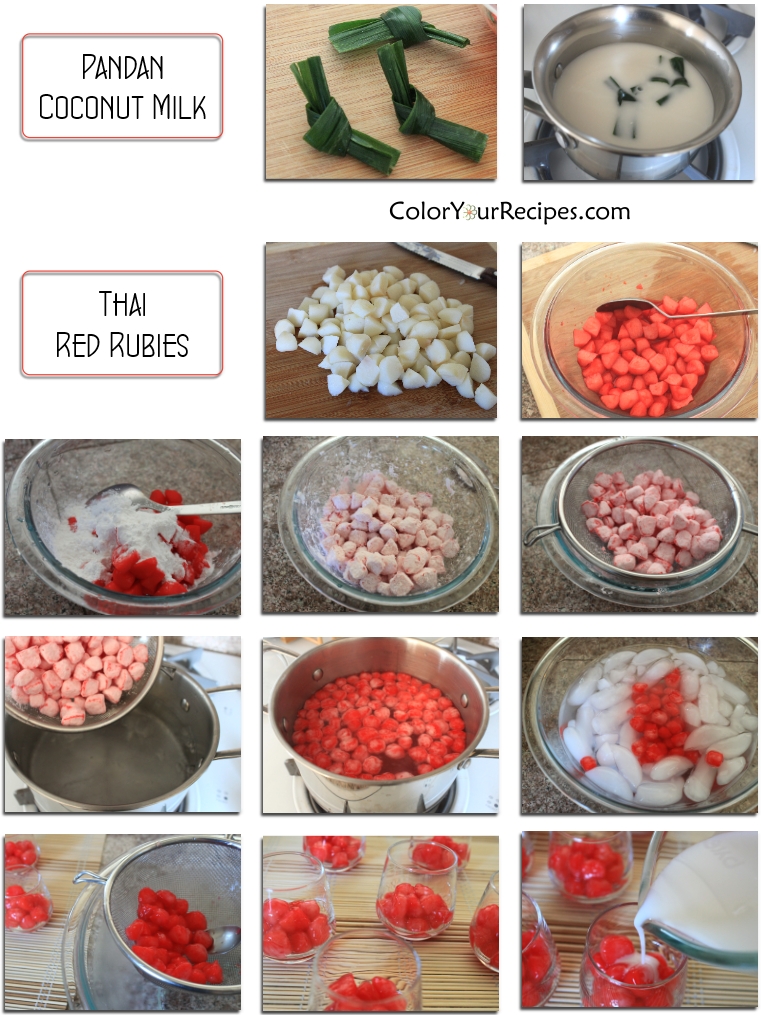
Red rubies

Drain the water chestnut and rinse. Cut them into small bite size pieces (about 6 pieces each chestnut).

In a small bowl add the red food coloring to the water and soak the water chestnuts for about 15 minutes.

Once the water chestnuts are colored, drain the colored red water.

Place the “rubies” in a bowl and toss the tapioca flour to coat, make sure that all the “rubies” are well coated with tapioca flour.

Remove the excess of tapioca flour by placing the coated “rubies” into a strainer.

In a medium pot, boil about 4 to 5 cups of water. When boiling, place the coated “rubies” in, and cook for a few minutes until they float. Scoop the “rubies” in a strainer and place them in ice water.

Assembly

Remove the “rubies” from the ice water and scoop the desired amount into small serving cups. Add the pandan coconut milk as you like and serve icy cold.

Note:If you like a thicker layer of chewy tapioca, spray water on the already coated “rubies” and coat them again with more tapioca flour…

I hope you enjoy this colorful and fun dessert inspired by Thai cuisine.

Did you know that water chestnuts is not a nut? Water chestnuts are aquatic vegetables, meaning that they grow under the water in marshes. Water chestnuts are low in calories and rich in dietary fiber and have good amounts of vitamins and minerals.

Thank you for visiting Color Your Recipes…have a colorful week!


Pan-Fried Beef Buns with Chive

Have you ever tried these crispy juicy buns? They come packed with flavors and surprisingly soupy…

The ground beef that I used in this recipe was provided by ButcherBox. The company offered me to try their products, therefore I received a generous box containing a variety of beef and chicken products and a package of uncured hickory smoked bacon.  Before I continue, I just want to clarify that I did not receive any compensation for this post and all the content and opinion in this post are solely mine. The box came to my door in dry ice and went straight to my freezer. The packages are very convenient as they are packed in small portion under vacuum.  If you like to learn more about ButcherBox, please check it HERE.

My son when little used to called these “Chinese hamburger” maybe because the filling resemble hamburger (ground beef), not to insult hamburger’s lover, but these beef filling of ground beef are much tastier than hamburger patties, they are loaded with chives, green onion, ginger and a hint of soy sauce and sesame oil.  I still picture my son’s face when eating these buns, he would have his spoon ready to collect the “soup” and drink it with such gratification.

These buns are crispy on the outside and slightly chewy…but I must advise you that there is a trick when eating the buns…you must first take a small bite making a small hole on the skin of the bun.  Carefully suck the juice (meat broth) from the bun and then eat as you would normally eat a bun.  If you do not extract the “soup” first, you will not only make a mess as the “juice” will come out as you bite and splash all over you, not to mention that you will lose one of the best part of these buns.

This recipe was inspired by my mom’s experience in the kitchen…

Ingredients:

Dough

  • 400 g bread flour or all-purpose flour
  • 130 g boiling hot water
  • 120 g cold water
  • Pinch salt

Beef Filling

  • 1 lb 85% lean ground beef
  • 1 small bunch garlic chives, finely chopped
  • ½ bunch green onion or scallion, finely chopped
  • ½ tablespoons finely grated ginger
  • 1 ½ teaspoon salt
  • 1 tablespoon cooking wine
  • ½ tablespoon sesame oil
  • ½ tablespoon soy sauce
  • 100 ml water

Method:

Dough

In the mixing bowl or bread machine bowl, place the flour and salt.

Add the boiling water to the flour and mix. The flour mixture will be lumpy.

Place the bowl in the mixer or bread machine or mixer and then add cold water. Mix until the dough is smooth, approximately 10 minutes.

Remove the dough and place in a container with lid and let rest for 1 to 1 ½ hour.

Beef Filling

Mix the ground beef, chives, scallions,  gingers and all the other seasonings together. Add water gradually to the beef mixture, and stir in the same direction until all the water had been absorbed in the meat mixture.

Assembly

Remove the dough from the bowl and weigh approximately 30g of dough (approximately 21 balls). If the dough is very stick, sprinkle a little bit of flour on the working surface.

Roll the pieces into circles of approximately 4in (10cm) in diameter. Wrap approximately1 to 1 ½ tablespoon of meat mixture) and seal it the same way as you are going to fold Chinese bun.  Place the fold side down and gently patch slightly flat.

When ready to pan fry, heat ½ tablespoon of oil in a pan under medium-low. Place the buns first fold side down and cover. Flip the buns until both side are golden brown. Approximately 5 minutes each side.

Serve hot.

If you enjoy this very traditional dish you might want to take a look at this Brazilian inspired Esfiha – Baked Meat Pie.

Did you know that onion and garlic chive belong to the same family? Garlic chive is widely used in Asian cuisine such as Chinese, Japanese, Korean, Thai and Vietnamese. Garlic chive is garlicky and juicy, often added in dumplings filling.

Thank you for visiting Color Your Recipes…have a colorful week!


Black Sesame Swirl Pumpkin Bread

This is a fun bread to bake using tangzhong method. It is so tasty with swirls of sesame paste in a pumpkin dough…and stay fresh and soft for days.

This is a fun recipe to make, especially that is Halloween…the combination of the sweet sesame swirl in between the soft, cottony pumpkin bread is just divine. Initially, people find a little skeptical because of the “black” swirl in the bread…no it is not mold…

The combination of the colors as well as the rolling and folding makes this recipe a fun process from the beginning to the end. But, don’t let me dictate how you should roll and fold…go ahead and handle the dough and the sesame filling however you wish.

Oh! Before I forget, I will be out for a couple of weeks and I am not sure if I will be able to “visit” you during this time, but I will make sure to catch up with you once I am back…

Ingredients:

Tangzhong or water roux

  • 15 g bread flour
  • 75 ml water

Bread dough

  • 300 g bread flour
  • 40 g sugar
  • 3 g salt
  • 4 g yeast
  • 125 g pumpkin puree
  • 15 g dry non-fat milk
  • 30 ml water
  • 30 g butter

Black sesame filling

  • 45 g sesame paste
  • 30 g sugar
  • 10 g all-purpose flour
  • 7 g corn starch
  • 45 g water
  • 10 g butter

Method:

Black Sesame Filling

In a small pan add the sesame paste, sugar, flour, corn starch and water. Mix well and cook under medium heat until a ball forms.

Remove from the heat and add the butter. Mix well until all the butter is incorporated into the sesame dough.Let is cool.

Set two sheets of plastic film and place the sesame dough in the middle. Gently roll the sesame dough with a roller pin to form a thin square of approximately 20 x 20cm.

Place the sesame sheet in the freezer until it is time to use as a bread filling/insert. For this particular recipe I used half of the sesame sheet.

Tangzhong or water roux

Whisk together the water and the flour until the mixture is well blended and free of lumps.

Stir the mixture while it cooks over the medium heat to reach 65C/150F. It takes about 2-3 minutes. Continue whisking until the mixture starts to thicken. The mixture of flour will have “lines”.

Remove from the heat.

Transfer to a bowl, cover with a plastic film to avoid “skin” from forming.

Ready to add to the bread dough once is cool.

Water roux or Tangzhong can bend kept in the fridge for up to 48hours.

Bread dough

In the mixer, add all the water roux, and all the other ingredients, except for the butter.

Turn the machine and stir for 2 to 3 minutes, until a ball forms.

Increase the speed to “2” and let it mix for 10 minutes. The dough will be very sticky, and less sticky as the gluten forms.

Add the butter and mix for 20 minutes more. Take a small portion of the dough (like a golf ball) and stretch gently until a very thin and transparent membrane (windowpane).

If the dough tears mix for another 5 minutes until you achieve the windowpane test. The windowpane test, demonstrated that the gluten is very well developed and it will create a very light crumb. The dough should be very elastic.

Remove the dough from the mixer and place in a bowl by covering with a plastic film.

Let dough proof until the dough tripled to its original size.

Assembly

Knock back the dough and roll the dough into a rectangle of approximately 20 x 30cm. Place the sesame insert into the middle and fold the dough over. Seal the extremities and fold into third and then into half. Again roll into a 20 x 30cm rectangle. Roll like a Swiss roll and cut into 6 into the baking pan.
into the Pullman pan (23 x 10 x 10 cm) and let it rise until almost 90% to reach the rim of the pan.

Bake in a preheated oven of 350F for approximately 25 to 30 minutes.

Remove from the oven and flip the bread into a wire rack to cool.

Slice the bread after is cool.

Store the bread in an airtight container.

If you enjoy this bread recipe using tangzhong or water roux method you might want to check on Frangipane Rolls or Milk Bread with Raisin.

Did you know that sesame seeds come from a fruit called sesame? Moreover, sesame seeds come in many colors such as white, yellow, tan and black. Sesame seeds are rich in protein and good fat, which can help to lower cholesterol.

Thank you for visiting Color Your Recipes…have a colorful week!


Glutinous Rice with Chinese Sausage

This is a recipe for a traditional glutinous rice known as sticky rice which is an staple in the Chinese cuisine which sausage, chicken or pork can be added.

Have you ever had glutinous rice? In spite of the name “glutinous” it does not contain gluten at all, like all the other varieties of rice. Glutinous rice is grinded to make mochi flour which is a very popular ingredient in many Asian desserts and even savory ones.

I grew up with glutinous rice and its derivatives…I love all the “chewy” food that you can make with it. Recently I shared the “pearl meatballs” recipe which the meatball (any of your choice) is coated with a layer of glutinous rice. Today, I am sharing with you another savory dish, somewhat like fried rice and risotto…not as dry as fried rice and not as creamy as risotto. Instead of the Chinese sausage, you can substitute for chicken or pork. The secret is the amount of water added while cooking the rice…if added too much you will end up with“glue” like mess…not pretty. So in order to prevent, I like to soak the glutinous rice overnight after rinse it thoroughly and cook under steam. When done right, each rice grain is intact, semi translucent, and chewy…oh…so good! Therefor if you like chewy texture you are for a great treat.

Ingredients:

  • 1½ cup glutinous rice
  • 3 to 4 dry shiitake mushroom
  • 4 Chinese sausages cut into small slices (or marinated chicken or pork with soy sauce and garlic)
  • 1 small shallot, diced
  • 2 stalks scallion or green onion, chopped
  • 2 ½ tablespoons soy sauce
  • 1 tablespoon cooking wine
  • ¼ teaspoon sugar
  • 2 teaspoons sesame oil
  • ½ teaspoon salt
  • ¼ teaspoon pepper (preferably white pepper)
  • Cilantro for garnish

Method:

One day before cooking the rice, wash the glutinous rice until the water runs clear. Soak in water overnight at room temperature.

On the day, drain all the water from the rice in the colander.

Soak the mushrooms in warm-hot water for approximately ½ hour until softened. Squeeze the water from the mushrooms and cut into small cubes. Save the soaking water from the mushroom.

In a small bowl add the soy sauce, sugar, cooking wine, salt, pepper and sesame oil. Mix well until all the sugar is incorporated into the sauce.

In a wok, under medium heat fry the sausage. Once the sausage are golden both sides, remove from the pan and set aside.

On the same pan, with the remaining fat from the sausage, sauté the scallion and the green onion until fragrant. Next, add the mushroom and continue to stir-fry for a minute, make sure to stir continuously to not burn.

Add the rice and the sausage. Stir well until all the ingredients are very well incorporated. Add the mixture of sauce and continue to stir. Sprinkle with the mushroom water and continue to stir under medium heat.

After a couple of minutes, transfer into a steam bowl. Cook under steam until the rice is semi translucent. If necessary sprinkle with more of the mushroom water or plain water.

Garnish with cilantro and/or scallion and serve hot/warm.

Leftover rice can be warmed under steam, water-bath or microwave.

Did you know that glutinous rice is also known as sticky rice? The reason that glutinous rice is sticky is because this kind of rice contains very little amount of amylose and high levels of amylopectin, which is responsible for its stickiness.

Thank you for visiting Color Your Recipes…have a colorful week!


Pumpkin Cream Cheese Cake

Looking for a light and fluffy pumpkin cheesecake?  This is all you need, Asian inspired cheesecake, it is more a cake than cheese.

Well, this is the thing…I did not know how to call this cheesecake like dessert…looks like a cake, but has cream cheese in it, and it resembles the cotton soft cheesecake with all the rights of a pumpkin pie…color and spice…this cake/cheesecake is so light, cottony and melt in your mouth. And you know what? It tastes much, much better next day after in the refrigerator for 12 to 24 hours.

So if you like all pumpkin stuff, get ready for a treat…this is much lighter than your conventional cheesecake and I must tell you that you will not be content with one slice…

Ingredients:

  • 50 granulated sugar
  • 3 eggs separated
  • ⅛ teaspoon cream of tartar
  • 10 g unsalted butter
  • 80 g cream cheese
  • 50 g milk
  • 50 g pumpkin puree (I used Trader Joe’s)
  • 20 g cake flour or pastry flour
  • 15 g cornstarch
  • ½ teaspoon pumpkin spice (I used Trader Joe’s)
  • Pinch salt

Method:

Line a 6 inch pan with parchment paper. To make it easy for the parchment paper to stick on the baking pan, coat the pan with a little butter before. If using a spring-form pan, wrap the bottom of the pan with a couple of sheets of aluminum foil to prevent the water into the pan when baking.

Preheat the oven at 315F (or lower at 300F…see method)

Sift the flour, cornstarch, salt and pumpkin spice.

In a double boiler place the cream cheese, butter and milk and pumpkin puree. Make sure that all the ingredients are melted and even. Remove from the heat and let it cool a bit. Add egg yolk one at the time, mixing after each addition. Fold in the flour mixture and mix well.

Make the meringue by whisking egg whites with cream of tartar until foamy. Add in the sugar and whisk until stiff peaks form.

Take ⅓ of the meringue and fold into the cheese/pumpkin mixture, once incorporated fold in another ⅓ of meringue, and finally the last ⅓ of it. Fold gently preventing the air bubbles from breaking.

Pour the mixture into the prepared round cake pan.

Bake the cheesecake in a water bath for 30 minutes at 315F and then lower the temperature to 300 and bake for another 45 minutes or until set and golden brown. You might want to decrease the starting temperature to 300F to avoid the cake to “crack” and then to 285F.

Leave the cake to cool down in the oven with the oven door open, about ⅛ hour, this might prevent the cake to shrink due to the drastic change in temperature.

Refrigerate the cake before serving.

Did you know that pumpkin is a fruit? Because pumpkin like all the other squashes develop from a flower therefore according to botanist pumpkin as a fruit with seeds in it.

Thank you for visiting Color Your Recipes…have a colorful week!


Kabocha Soup with Miso

This is an Asian inspired pumpkin soup made with kabocha and a hint of miso.  It is creamy and loaded with umami flavor.

Pumpkin season…all kind of squashes…I love them all…all kind of shape and texture…every different squash has its own quality.

Since my parents got a lot of Japanese influence when growing up, our table too was a reflection of it…and kabocha squash (Japanese pumpkin) was often seeing, either steamed or sauté…and of course I carried all my mom’s cooking tips with me…and often I call her to find out how she did this or that…and I add my “touch” into it.

I have been seeing this squash all year round in regular grocery store, even at Trader Joe’s…this squash is somehow sweeter than the other species, and the texture is somehow in between sweet potato and the flaky chestnut.

I usually scrub well the skin, cut into 1 to 1 ½ in cubes and steam or cook with a bit of water and serve as a side dish or add to salad. Because I decided to make soup, I removed the skin, so the color of the soup would look nicer, but if you do not care for it, go ahead and leave the skin.

The combination of the sweetness of the kabocha with the salty miso gives the ultimate “umami” flavor, a very unique and exquisite one.

Ingredients:

  • Approximately 500 g kabocha, steamed
  • 3 to 4 garlic cloves, finely minced
  • 1 small onion, chopped
  • 1 tablespoons olive oil
  • 5 to 6 cups vegetable or chicken broth
  • 2 tablespoons white miso diluted in 2 tablespoons of water
  • Salt and pepper to taste
  • Scallion for garnish

Method:

Wash the kabocha squash and dry it before cutting. Please be careful as the squash is somehow very hardy. Remove the seeds and the pulp with a large spoon. Cut into slices of approximately 1 in wedge. You can use the seed for roasting.

Place the kabocha in a steamer with enough water. Steam the squash under high heat for approximately 10 minutes. Once cooked it can be served cold in salad or drizzled with miso sauce. For the soup continue with the following.

In the medium pot sauté onion and garlic with olive oil under medium heat until the onion is soft, be careful not to burn.

Add the broth either vegetable or chicken. Then add the steamed kabocha and the diluted miso paste.

Let it boil for a couple of minutes and remove from the heat. At this point you can either transfer the soup mixture to a blender or use a emulsion stick to puree the soup.

Pour the mixture back to the pot and continue to cook for another couple of minutes in medium-low heat.

Adjust for salt and pepper and more liquid (broth) according to your taste.

Garnish with finely chopped scallion or pumpkin seeds.

Serve hot.

Did you know that kabocha like all the squash is rich in beta carotene? Moreover, it is rich in vitamin Ciron and potassium. Kabocha is available all year round and the skin is completely edible.

Thank you for visiting Color Your Recipes…have a colorful week!


Pearl Meatballs

These is a simple recipe for meatballs covered with a layer of glutinous rice. The combination of texture is just magical…

Have you ever missed food that you used to eat when little? When living in Brazil my mom used to make these meatballs covered with a layer of glutinous rice, aka sticky rice. Since I am a big fan of anything “glutinous” it is not surprise that this would be one of my favorite dishes. Now, don’t ask me why pearl, as from my understanding pearl should be smooth and elegant and the look of this so called “pearl meatballs” do not resemble in any way or shape (maybe the shape being round) of a pearl…to me personally they look more like an albino porcupine…with the glutinous rice going in every possible direction.

Regardless of the shape and name, the combination of the juicy meatball with the sticky rice is just amazing…you will not believe how tasty and detectable this combination is until you try it. I must admit that mine did not come out as nice looking as I remember my mom’s…but still tasted terrific. As for my husband, it was his first time seeing and eating these meatballs covered with “sticky” rice and for my surprised he enjoyed it. It is a very simple recipe, you just need a little planning as the glutinous rice needs to the soaked overnight for easy cooking.

So gather the ingredients below and give these little pearls or whatever name you like a try.

Ingredients:

  • ½ cup glutinous rice
  • 1 lb lean ground pork
  • 4 dried shiitake mushrooms, soaked and finely chopped
  • 1 ½ tablespoons ginger,  finely grated
  • 3 stalks green onion, finely chopped
  • 2 tablespoons cooking wine
  • 2 tablespoons soy sauce
  • 2 teaspoons sesame oil
  • 1 tablespoon vegetable oil
  • 1 egg
  • Salt and pepper to taste
  • Green peas, soybean and/or carrot in cubes for decoration

Method:

The day before, rinse the sticky rice until the water runs mostly clear and soak overnight at room temperature.

On the day, drain well all the water from the glutinous rice by using a strainer and transfer on a deep dish or plate.

Mix the ground pork with all the other ingredients together except the glutinous rice, carrot and pea. Mix well, until all the meat and the other ingredients are binding together.

Make small balls with the meat mixture. I personally put a glove on my left hand and pick a small amount of the meat mixture, gently make a fist and scoop the balls of meat forming in between my thumb and pointer finger using a wet spoon so the meatballs will not stick to it.

Gently drop the meatball on the plate with the glutinous rice and roll the balls until all of it is coated with the glutinous rice. Repeat the process with the remaining meat mixture.

Decorate each meatball with carrot or pea.

Steam the meatballs on high heat for approximately 15 to 20 minutes until the meatballs and the glutinous rice are completely cooked. The glutinous rice will be somewhat translucent.

Serve hot with soy sauce, chili sauce or both.

Did you know that glutinous rice is gluten free? Yes, the name is very deceiving…it is called glutinous due to its stickiness and glue-like after cooking. Glutinous rice is also called sticky rice and sweet rice. Glutinous rice is also ground to make flour and used in many Asian desserts, also know as mocha flour.

Thank you for visiting Color Your Recipes…have a colorful week!


Frangipane Toast

This toast is almost like a dessert for breakfast. The toast is covered with a layer of creamy frangipane and topped with toasted slices of almond.  Perfect with a cup of tea or coffee.

Okay, you might feel that I am cheating…this is a simple version of the Frangipane Rolls. Since we had so much frangipane rolls, I decided to use up the almond cream so it would not go bad. In this recipe I used the same dough, just in different format. I spread a generous layer of almond cream, sprinkled some sliced almond and voila…

Can I tell you a secret? I just learned when writing this post that the past tense of the verb “spread” is “spread”…so interesting as I am see myself always learning English…

Going back to the toasts…after the layer of sliced almond, I had them all packed two by two with the sliced almond facing each other (so it would not “glue” together) and together they went into a freezer bag and freezer. A week later, I just popped them into a 350F directly from the freezer to a preheated toaster oven and baked for about 15 minutes, or until the almonds were golden…just before serving sprinkled powder sugar on it and here we had in front of us an amazing toast. It was absolutely delicious…each bite came with all three layers of light and crunchy almond, creamy and fragrant almond cream, and finally a soft and cottony layer of rich bread.

As you can see, this is a no-recipe post…all the ingredients and methods can be found HERE. I hope you get to try this, as it is much easier and adaptable for our busy life.

Below is what I did…by pictures…

And the toasts are ready for your enjoyment!

Did you know that almond is a rich source of B and E vitamins? Some research papers suggest that consumption of almonds consumption can increase blood levels of HDL (high density lipoprotein, good cholesterol) and decrease LDL (low density lipoprotein, bad cholesterol)?


Thank you for visiting Color Your Recipes…have a colorful week!


Frangipane Rolls

If you love anything almond you will love this rolls. Layers of creamy frangipane in between soft and cottony bread made with tangzhong method.

Here I am with another recipe for bread…this time I made two kind of bread using the same batch of dough. This is a super versatile dough as you can all kind of rolls and buns with it, sweet or savory version and even a sandwich loaf, which I did.

This dough taste almost like brioche without all the butter…very soft and rich in flavor due to the heavy cream and eggs. Since I baked these rolls, I already used this same dough recipe for cinnamon rolls and cheese and caramelized scallion rolls…so good!

I love everything almond…and frangipane which is merely an almond cream is one of my favorite way to enjoy almond…I love frangipane in tart, pies, cake and in rolls.
Each bite of this roll is loaded with fragrant almond cream in between a soft and cottony bread dough…heavenly!

When mixing all the ingredients, initially the dough will be very “wet”, do not panic as gluten develops you will see how “miraculously” the dough will all come together in a very soft and elastic ball. As a matter of fact when the dough reach the windowpane stage, you will be able to stretch so thin as the dough is so soft.

Please note that I had some frangipane left which I used to make frangipane toast…recipe coming soon.

Ingredients:

Water roux or Tangzhong

  • 40 g bread flour
  • 200 ml water

Bread Dough

  • 550 g bread flour
  • 85 g sugar
  • 7 g salt
  • 7 g yeast
  • 50 g heavy whipping cream
  • 2 eggs slightly beaten (minus 1 tablespoons, for egg wash), complete with water to reach 120g
  • 60 g butter (unsalted)

Frangipane (almond cream)

  • 200 g almond paste (store bought or homemade)
  • 2 eggs
  • 50 g butter, unsalted
  • ½ teaspoon almond extract

Topping

  • Egg wash: 1 tablespoon egg (from the dough), 2 drops of water, 1 drop vanilla extract
  • ¼ to ⅓ cup almond, sliced

Method:

Water roux or Tangzhong

In a small pan, mix all the ingredients of water roux, place in a low heat and stir constantly until the temperature reach 65C (150F), or if you do not have a thermometer, cook until ripples form. Set aside to cool by covering with a plastic film. Please see here.

Bread Dough

Place all the cooled water roux and all the ingredients listed under dough into a mixer except for the butter. Mix until all the ingredients are together, it will be slightly sticky.

Increase the speed to number 2 and continue to mix for 5 minutes.

Add the butter and continue the mixing until the dough is smooth and comes out of the mixing bowl, this will take approximately 15 minutes. You will notice that the dough will no longer be that sticky.

Place the dough into a medium to large bowl. Cover and let it proof until the size triple from the original size.

Frangipane (almond cream)

In the mixing bowl, add almond paste. Beat on medium speed, scrape the sides of the mixing bowl.

Add the eggs, one at the time and beat well after each addition. Always scrape the sides of the mixing bowl.

Add the butter and the almond extract, beat until the butter is incorporated in the cream.

Now the frangipane is ready to be use. It can be store in the refrigerator for a couple of days.

Assembling the Frangipane Rolls

Knock back the dough and weigh 550g (for the Pullman loaf) and the remaining for the frangipane rolls.

For the Pullman loaf, follow HERE.

For the frangipane rolls, roll the dough it out to form a rectangle of approximately 35x28cm (14x11in).

Spread the frangipane, leaving approximately 1cm (½ in) in the border along the wider edge.

Starting at the covered edge, roll the dough up like a Swiss roll.

Press the edges together and cut the roll into 12 slices and then place these cute side up in the pan.

Cover with clear film. Leave to rise in a warm place for 40 to 45 minutes, or until the dough slices have doubled in size.

In the meanwhile, preheat the oven to 350F.

Just before placing the buns in the oven, prepare an egg wash with the tablespoon of egg with 2 drops of water and 1 drop of vanilla extract (if desire).

Brush the top of the buns with the egg wash and sprinkle with sliced almonds.

Bake the buns for approximately 20 minutes and the Pullman loaf for 25 minutes.

Remove from the oven and flip the rolls and loaf into a wire rack to cool.

Serve the buns warm or room temperature.

Wait for the Pullman loaf to cool completely before slicing.

Store both the buns and the bread in an airtight container.

Did you know that frangipane can be used like a pastry cream? Next time baking any tart that requires pastry cream you can substitute it with frangipane.

Thank you for visiting Color Your Recipes…have a colorful week!