1

Air Fried Yuca

These air fried yuca are like French fries…great as a side dish…crispy on the outside and creamy on the inside.

I grew up eating “mandioca frita”, which translates into fried yuca…of course at that time it was fried using hot oil like the traditional French fries…the texture of the yuca, which is boiled before frying is rich, creamy, slightly nutty and sweet…denser than French fries, but equally delicious.

– What is yuca?

Yuca is called “mandioca” in Brazil, a very popular root vegetable, super common in Brazil.  As a matter of fact, tapioca is made of yuca starch.

– How is yuca prepared?

Yuca can be prepared the same way as potatoes…boiled, fried, mashed…and toasted as it is “farofa”, a side dish for meats, feijoada (black bean stew), poultry (as stuffing).

– What is the difference between mashed yuca and mashed potatoes?

Both are root vegetables rich in carbohydrates…If you like mashed potatoes, you must try mashed yuca. Mashed yuca has a slightly “chewier” texture than mashed potato, it is super creamy, nutty with a hint of sweetness…

– Why yuca is wrapped in wax?

Apparently, the layer of wax is to protect the root in order to preserve it and extending its shelf-life… which it not seeing in Brazil due to its popularity. Nevertheless, just remove the was when peeling the yuca and you are good to go.

– Where can I buy yuca root?

You can find yuca in most of the Asian and Latin grocery stores, and occasionally in the frozen section, which the yuca comes peeled and cut.

– Ready to try this new root?

  • Actually, there is no need for recipe…just a few steps to follow…
  • Peel the yuca root by removing all the wax and the dark brown skin.
  • Cut into pieces of approximately 2 inches.
  • Boil in water with salt until the yuca can be pierced with a fork.
  • Drain well, remove the hard-fibrous stems in the center of the cooked pieces.
  • Place the cooked yuca in a bowl and toss olive oil, salt and pepper to taste.
  • Air-fry at 365oF for approximately 15 minutes or until the edges are golden brown, tossing in between cooking.
  • Serve hot/warm.

– Care for more Brazilian recipe?

Check these out…

Did you know that yuca is a staple food in many Countries? Moreover, it is the third largest source of carbohydrates food followed by rice and corn.

Thank you for visiting Color Your Recipes…have a colorful week!


Guava Swiss Roll

This soft and delicate chiffon base cake rolled with a layer of guava jam is super delicious, an exotic fusion between Latin and Asian…all in one bite.

– Why this guava swiss roll is different?

The recipe is a mix of Asian inspired chiffon cake filled with the very popular Latin American guava jam/paste., and the combination is a sweet and distinct guava jam in between a super soft and moist chiffon cake.

– Guava paste/jam?

Well, back in Brazil we used to have all sort of desserts with guava paste (goiabada) in cakes, pies, cookies, donuts you named it, and it could be by itself or with cheese, yes, you read it right, cheese…which it’s called Romeo and Juliet…the combination of the sweet guava paste and the saltiness of the cheese is amazing…it really wakes your palate…with all this said, when I saw the guava jam in my refrigerator I got the inspiration to use as a filling for the cake roll.

– Can I make this roll is advance?

Absolutely, you can make a couple of days in advance, store in the refrigerator and remove two hours before serving and let it reach room temperature or serve it cold. The cake is delicious accompanied by a cup of tea of coffee.

Ingredients:

  • 3 large eggs separated (make sure the bowl with egg white does not contain any trace of grease)
  • 45 g vegetable oil (I used sunflower)
  • 45 g milk
  • ½ teaspoon vanilla extract
  • 60 g cake flour
  • 1 pinch salt
  • 6 g white vinegar
  • 60 g sugar

Method:

Preheat oven at 275oF.  Line a 9 x 13 inch (23 x 33 cm) jelly pan with parchment paper.

In a small bowl, mix cake flour with salt., and set aside.

In a medium bowl, stir together egg yolks, oil, milk, vanilla extract. Add the sifted mix of cake flour and salt to the egg yolk mixture. Mix well until smooth and all the flour is well incorporated, resembling a pancake mix batter.

In a large bowl of a hand-held mixer or stand mixer whisk the egg white with the vinegar until large bubbles form. Add the sugar slowly into thirds. Whisk until medium/firm peaks form. Do not over beat, the meringue should be shiny and form soft but firm peaks.

Add about ⅓ of the meringue to the egg yolk mixture and mix gently until all the egg white is incorporated to the batter.

Pour the egg yolk mix to the remaining meringue and fold gently until all the egg white is combined to the batter.

Pour the batter into the prepared baking sheet and spread evenly. Gently tap the pan against the counter to remove excess of air bubbles. Bake at for 20 minutes or until a toothpick inserted in the middle of the cake comes out clean. Remove cake from the oven and transfer it with its parchment paper onto a wire rack and let it cool.

In the meantime, add a little water to the guava jam, and cook until smooth. Let it cool.

Assembly

To peel off the parchment paper, place another piece of parchment paper or silicone mat on the cake with a pan, flip the cake and remove the parchment paper from the cake.  Place the parchment paper again on the cake and flip the cake one more time. Remove the silicone mat of the parchment paper.

Roll the cake from the short end and let it settle for 10 minutes. Unroll the cake and spread a layer of guava jam (or any of your preference), gently re-roll the cake back while peeling the parchment paper off. Cut the edges from both sides.

Transfer to a serving plate. Serve at room temperature or chilled.

– If you enjoy this recipe, you might want to take a look at these…

Did you know that guava is rich in vitamin C and dietary fiber? Because guava contains high amount of pectin it is commonly used to make jams, paste, preserve.


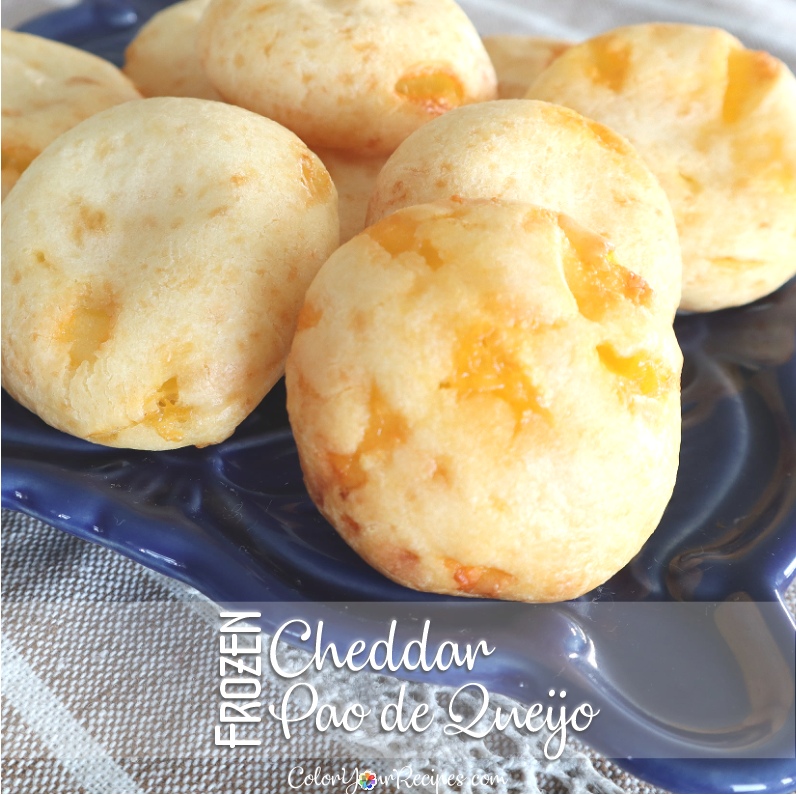
Frozen Pão de Queijo, Brazilian Cheese Bread

This is a simplify version of the Brazilian “pão de queijo”, it is cheesy and gluten free.  It makes a great appetizer and can be made way ahead.

I already share so many versions of the famous Brazilian pão de queijo…recipes which each little ball is hand shaped, blended and pour in a waffle iron, Asian style and now blended and frozen for later enjoyment.

– What is “pão de queijo”?

Pão de queijo when translated from Portuguese should be cheese bread. In reality, it is not a bread as you know as bread…it is usually small baked roll with cheese and the base of the roll is mainly tapioca flour and not wheat flour. The texture is not like your regular bread, it is sort of chewy, cheesy and let’s say very different. In my opinion it is a sort of popover, choux pastry…there is no any raising agent such as yeast or baking powder, the air pockets in the little cheese bread are mainly due to the combination of egg, oil, liquid (milk) and tapioca flour.

– History of “pão de queijo”

Pão de queijo recipe is typical from Minas Gerais, which is a state located on the eastern side of Brazil, north of the state of São Paulo. The recipe is traditionally passed from grandmother to their daughters and from the daughter to the granddaughters…the difference in the ingredients may vary from water to milk, oil from lard, but the idea is the same. Apparently started with a piece of leftover cheese, since wheat flour was not common at the time being that tapioca flour from yuca (cassava) was available, somehow in between “pão de queijo” emerged.

– Why you need to make “pão de queijo”?

Because is it easy and a crowd pleaser.  I always have a “bag” of these in my freezer…and I bake whenever we feel like having a small snack, a something to go with a bowl of salad or soup, as an appetizer when entertaining.

– Why this is a great version?

This is the simplest version of all and can be made way ahead…all the ingredients are mixed in a blender and pour is a small silicone mold and place into the freezer. Once frozen they can be stored in a plastic frozen bag (to save freezer space) and store for months until time to bake.

– Have I convinced you? Okay…let’s look at the recipe…

Ingredients:

  • 1 cup milk
  • 3 eggs
  • ⅔ cup vegetable oil such a sunflower, canola or corn
  • ½ teaspoon salt (or to taste)
  • 125 g grated Parmesan cheese
  • 345 g tapioca flour
  • 120 g grated Cheddar cheese

Method:

Place milk, oil, eggs and salt in the blender. Blend until all the ingredients are mixed.

Add the parmesan cheese and blend in.

Add tapioca flour in thirds and pulse after each addition, making sure that the batter is smooth. Scrapping the side of the blender cup as needed.

Now, you can either add the cheddar cheese and pulse a couple of times or remove the blender cup from the motor and add the cheddar cheese and mix carefully with a spatula, until the cheese is incorporated into the batter.

Pour the batter into small silicone mold (approximately 0.6 oz or 18 ml each cavity). As the silicone bakeware are flexible, place them on a cookie sheet or any metal tray.

Place the trays in the freezer for a few hours until the batter is frozen.

Once the cheese bread (balls) are totally frozen, quickly remove the frozen cheese balls from the silicone bakeware and place them into a freezer bag and in the freezer until time to bake.

When baking the cheese bread, place the frozen cheese bread directly in a preheated oven of 350oF for approximately 15-20 minutes. Make sure to leave at least 1 in (2.5 cm) in between the cheese bread (balls).

Serve hot/warm.

Take a look…it is soft and chewy and loaded with cheese…

– Looking for other versions of the Brazilian pão de queijo?

Did you know that tapioca flour is a product of the cassava? Cassava, yuca or manioc is a root like yam, taro,  and potato, therfore totally grain and gluten free. Cassava is  very popular in South America, parts of  Asia and Africa.

Thank you for visiting Color Your Recipes…have a colorful week!


Esfiha – Baked Meat Pie

This is a very popular snack found in Brazil, it is mainly another version of our “hamburger” the ground meat baked wrapped in a bread dough.

Sorry for being away…this couple of weeks so much has happened in my life…one of my very good friends has stopped all the treatments for cancer, therefore she is under palliative and hospice care, with the support of my husband I flew with her out of state to help and spend some time with her along with her family. During the time I was with her, we talked and talked, we laughed and cried, we remembered facts in the past, places we went together, we teased each other…and we comforted each other…it was so hard to say goodbye when was time for me to come home, but she was always very gracious and comforting, telling me that she was okay and that I could leave and not to worry about her. It was an experience that I have never imagined going through…it was a life lesson, being able to face death openly and accept that we all one day will have to come across with. As for now, we still communicate by text and phone, and I am so thankful that she is in such a good spirit, very peaceful, serene and enjoying every day.

I hope I did not spoil your day by sharing this event…now the bright side of my post…a recipe for esfiha, which are simply meat pies. Esfiha are very popular in Brazil. These meat pies are of Middle East origin and they are found everywhere, a very common street food. They can be open-faced, like pizza and topped with cheese, lamb, beef or vegetables.

What I have here is a closed one, and for the dough I used an Asian inspired recipe, therefore the bread dough is super soft and cottony as compared to the recipe that I originally posted HERE…no more ”talk” and let’s head for the recipe. By the way, these meat pies are so tasty and juicy, they can be frozen, and are great as an appetizer or as a main dish served with a side salad. One more thing…they are usually served with hot sauce or wedge of lime/lemon.

Ingredients:

Dough, from HERE

Meat Filling
1 lb 85% fat ground beef
2 tomatoes, seed removed and chopped
1 medium onion, chopped
¼ teaspoon ground all spice
½ cup fresh parsley, finely chopped
1 tablespoon olive oil
Salt and pepper to taste

Egg Wash
1 egg
½ tablespoon water

Method:

In a large mixing bowl combine the ground meat and all the other ingredients, mixing them together. Set aside in the refrigerator for approximately 2 hours. Remove the excess of liquid. Mix again gently and it is ready for the assembly.

Assembly:

After the first rise, divide the bread dough into small balls, approximately 45 to 50 g each. Roll into small circle of about 12 cm or 5 inch in diameter.
Place in the middle of the circle approximately 2 tablespoons of the meat mixture.
Fold the circle into thirds, forming a triangle shape pie. Seat the ends and place them on a cookie sheet lined with a silicone mate or parchment paper.

Preheat oven to 350F.

Cover the pies and let them rise for approximately 30 minutes or until the pies double of its original size.

Gently brush the top of the pies with the egg wash.

Bake the pies in the preheated oven for 25 minutes, or until the top is golden brown. Please note that some of the filling might “leak” and it should be bubbling.

Remove from the tray and let it cool on a wire rack. Serve warm with hot sauce and/or lemon/lime wedge.

Did you know that esfiha is also called sfiha in Arabic? It means meat with dough. In Brazil, esfiha is very popular due to the presence of a large Arab population.

Thank you for visiting Color Your Recipes…have a colorful week!


White Bean Stew

This is a Brazilian inspired recipe for white bean stew. Bean and rice are present in every meal in Brazil, okay, except breakfast. In this recipe instead of the traditional pinto beans I used white beans.

In Brazil, like many Latin American countries, rice and bean (arroz e feijão) is a basic in almost every meal…Brazilians eat beans for lunch and dinner, and it is mainly served with rice. The most used bean for the everyday meal is a bean very similar to pinto beans, but the Brazilian national dish called “feijoada” which is a stew made with beef, pork, it uses black beans.

Since it is an everyday dish, you can imagine how many recipes for making beans is available, every person has their personal touch to the everyday “feijão”…well, I am sharing with you a very simple recipe that I have been using for ages, and again, feel free to adapt to your own taste, make it vegetarian, meaty…use black beans, pinto beans, kidney beans but please make sure to not skip the bay leaves…they give this dish an exceptional flavor…you can make it thicker or soupier, with or without garlic…

You can soak or not, use pressure cooker, slow cooker, thermos cooker or just on the stove…you just need to make sure that the beans are cooked through.

Ingredients:

  • 2 cups dried beans, any type
  • 5 cups cold water
  • 1 to 2 bay leaves
  • 2 tablespoons olive oil
  • 2 to 3 cloves garlic, minced
  • 1 small onion, finely chopped
  • 2 strips of bacon, finely cut (optional, skip for vegetarian version)
  • Salt and pepper to taste

Method:

Wash the beans and soak overnight.

Rinse the beans and place them in a pot with water and the bay leaves. Cook the beans according to your preference.

Once the beans are cooked, in another pot drizzle the olive oil and sauté the bacon (optional), garlic and onion until slightly golden brown and fragrant.

Add the beans together with all of the liquid. Increase the heat to medium. You can smash some beans on the side of the pan with your wooden spoon, to make a thicker bean sauce if you desire a thicker stew.

Add salt and pepper to taste.

Serve together with rice

If you enjoy this Brazilian simple white bean stew recipe, please check HERE for more Brazilian Inspired recipes.

Did you know that beans are an excellent source of protein, very low in fat and exceptionally high in fiber? They are also a very good source of calcium, iron, folic acid and potassium.

Thank you for visiting Color Your Recipes…have a colorful day!


Brazilian Egg Yolk Custard with Coconut

This is a recipe for a Brazilian inspired recipe for egg yolk custard with coconut.  This is so creamy and rich, a traditional dessert from Brazil.

Quindim is a popular Brazilian baked dessert made from sugar, eggs and coconut. It is extremely sweet (in most cases) and very much addictive.

Since quindins (plural for quindim) are very ready available in almost every corner…yes, literally every corner…I did not have the need to bake my own when living there…now that we do not have this treat around I decided to bake my own…and of course to the internet I go…I came across hundreds of recipes…mainly they all have the same ingredients, varying only in ratio. As mention above, quindins are extremely sweet, therefore my search for a “perfect” version of quindim was a big mission, I was looking for a recipe not overly sweet and at the same time without losing the magic of it…meaning, bright yellow color with an incredible creamy, sticky consistency. After comparing recipes and going through many calculations…I think I pretty much nailed it down.

One more thing…apparently, now days in Brazil it is very popular finding quindins with flavors, such as chocolate, apricot, passionfruit, walnut, coffee, pistachio, pineapple and so on…I yet have to try them, but from what I have seen, I think I will still go for the original one…

This is a very simple recipe, only 4 ingredients, and no especial machinery or technique. This recipe was inspired from here please feel free to double or triple (original) the recipe. You can bake it either in small muffin size mold or in pie pan. Please note that initially the coconut layer will be on top when pouring the batter, once baked, and flipped on a plat, the coconut layer will be on the bottom and the creamy dark yellow layer will be on the top.

Ingredients:

  • 5 egg yolks
  • 17 g coconut (fresh or dry)
  • 65 ml coconut milk
  • 50 g sugar
  • Butter and sugar for coating the pan

Method:

Preheat an oven to 350F

Prepare the pan (approximately 11 cm or 4 ½ in) by coating it with butter and sugar generously.

Pass the egg yolks through the strainer to remove all the membranes from the egg yolk/white.

Add sugar to the egg yolks and mix. Add the coconut and then the coconut milk. Mix until homogenous.

Pour the mixture into the prepared pan. Place the pan in a larger oven safe pan. Pour boiling water into the bottom of the larger pan to reach about half-way up the side of pan with the custard (bain-marie).

Bake in the preheated oven until slightly golden brown on top, about 30 minutes.

Let it cool completely before turning out onto a serving dish.

Refrigerate, serve cold.

If you enjoy this simple Brazilian dessert, you might want to check on Flan.

 Thank you for stopping by Color Your Recipes…have a colorful week!


Waffle Iron Pão de Queijo

This is a simplified Brazilian inspired recipe for pão de queijo, instead of fussing around with the dough you can enjoy these treats just by adding a pancake like batter into the waffle iron.

At the first sight you might be thinking…”What is new about these waffles? Who has never seen waffles?” Well, I must tell you that many times look are deceiving…and here is a perfect example…these are waffles made with tapioca flour, loaded with cheese…yes, you read it right…CHEESE!

Okay, now this is something that you should give a try if you own a waffle maker…why? It is amazingly delicious, gluten free and so simple to make.

I was very skeptical in getting a waffle maker, not that all the recipes out there were not tempting…far from that…it was because of my limited kitchen space…initially I wanted a bigger waffle maker, the one that can be turned, but space really did not permit me to get one. As a matter of fact when I brought the idea of getting a waffle maker, my husband even joked my saying if I was planning to put the waffle maker on top of my head…well…and I found a small one online which can be store up therefor it would not take much of space.

What do I make first? These crispy, slightly chewy inside waffle…these are a twist on the pão de queijo. Remember the Brazilian chewy cheese balls? Okay, so this is a simple version of it. The nice thing about this recipe…not much cleaning is required, with very little labor…

So get your tools together and start preheating your waffle maker…these are simply awesome!

Ingredients:

  • 100 g tapioca flour
  • 1 large egg
  • ⅓ cup of milk (I used fat free, but feel free to use whatever milk you like)
  • 2 tablespoons of vegetable oil
  • ½ teaspoon salt (less if you like)
  • 40-60 g grated Parmesan cheese (or any kind of cheese, preferably dry ones), more the cheesier.

Method:

In a deep cup, place the milk, egg, salt and cheese. Using an immersion blender or regular blender, mix well all the ingredients. Once well mixed, slowly add the tapioca flour, by continuously mixing. Make sure that all the tapioca flour is incorporated into the egg and milk mixture. The batter will look like a thinner version of pancake batter.

Place approximately ⅛ cup of the batter into the preheated waffle maker and follow the instruction of your machine. The amount of batter will vary according to your like. I you are like me, I like crispier and crunchier waffles then you should add less batter.

The thickness of the waffles can be controlled by the amount of batter you place on the waffle maker. Many times with the leftover batter, I like to add very little batter to the machine and let it crisp all the way. Let them cool and store this waffles/crackers in an air tight container for later enjoyment…these sure make great snacks.

Serve hot or warm….simply delicious!

I hope you enjoy this simple recipe using a waffle maker…for more similar recipes please check on the Mochi Bacon Cheese Ball or the Brazilian Pao de Queijo recipes.

Did you know that pão de queijo is a very popular breakfast item in Brazil? Since pão de queijo uses tapioca flour, they are great for people that are sensitive to gluten.


Thank you for visiting Color Your Recipes…have a colorful week!


Chicken and Cheese Pockets

This is a Brazilian inspired recipe, where creamy cheese and shredded chicken are wrapped inside a puff pastry dough like little pocket pie.

My family Thanksgiving dinner is not very traditional, yes, we have turkey, yams, pumpkin pie, ham and all the other dishes that you normally see on a Thanksgiving meal, but we also have lots of fusion dishes as we all bring one of our favorite dishes to share. It is a real feast…

This year I decided to make these little pockets, they are simple and very easy to make. I filled the puff pastry with a creamy chicken filling with celery, carrot and cheese. It can be serve at room temperature or warm, as I prefer them warm.

These pockets are perfect when entertaining since they come in little bites and can be made ahead. Again, you can always use your favorite filling…how about some leftover turkey?

Ingredients:

  • 2 chicken breasts cooked and shredded, or leftover from a roasted chicken
  • 3 celery stalks, cut into small cubes
  • 2 carrots, cut into small cubes
  • 1 medium onion, diced
  • 1 tablespoon butter
  • ½ tablespoon olive oil
  • 1 cup milk
  • 4 to 5 Laughin Cow cheese wedges, which can be substituted by cream cheese
  • Fresh parsley, finely chopped
  • Salt and pepper to taste


  • 2 boxes of puff pastry sheet
  • 1 egg yolk, slightly beaten with 1 teaspoon water


Method:

Chicken Filling

Boil the small cubes of carrot, just enough to soften a little, drain well and set aside.

Sautee the onion in the butter and olive oil, add the shredded chicken, celery and milk. Let if cook for a few minutes and add the cheese wedges, mixing gently until all the cheese are melted into a thick sauce.

Add salt, pepper, carrot and let it cook for another minute. Add the parsley and stir so the parsley is well mixed into the chicken filling.

Remove from the heat and set aside to let it cool.

Assembly

Thaw the puff pastry sheet in the refrigerator for a few hours or overnight.
Preheat oven to 375F. Prepare the cookie sheet by greasing or use a silicone mat.
Cut the puff pastry sheet into small squares of approximately 3 x 3 inches.

Spoon approximately 1 to 1 ½ tablespoon of the chicken filling in the middle of the square and gather all the four corners of the square and bring them up to the center. Pinch the dough together to secure the filling inside of the pockets.

Transfer the pockets to the baking sheet and brush each square with the egg yolk wash.

Bake in the preheated oven for approximately 25 minutes, turning the baking sheet once to make sure that the pockets are evenly golden brown.

Transfer to a wire rack and let cool slightly. Serve warm or at room temperature.

Makes approximately 36 pockets.

Make ahead Tips

The chicken filling can be made ahead. Once cooled store in a covered container and refrigerated for up to 3 days. Remove the filling from the refrigerator approximately one hour before filling the pastry pockets.

Another option is to have the chicken pockets completely assembled and frozen, unbaked. Once the unbaked chicken pockets are frozen transfer them to a freezer container. The frozen chicken pockets can be baked by placing them directly to a preheated oven. Make sure to bake a little longer.

I hope you enjoy this recipe for chicken and cheese pockets…

Have a great week and thank you for visiting Color Your Recipes!


Veggie Pie

This is a very simple and easy recipe for veggie pie inspired by a very popular recipe in Brazil, and of course if you prefer you can always add shredded chicken or any kind of meat of your preference.

I made this pie because we were going to a potluck party and the host requested a vegetarian dish, so I adapted the recipe that I made a while ago, and substituted the shredded chicken and vegetables for only vegetables. Believe me, it is still very tasty and everyone liked it.

One more thing, this  great veggie pie or cake (whichever way you want to call it) is very practical to take to a potluck party because it can be served cold or room temperature…or to take to work for lunch, and can easily be warmed in the microwave.

Ingredients:

Pie/Cake Batter

2 cups milk
¾ cup canola oil or any vegetable oil
3 eggs
2 tablespoons grated Parmesan cheese
1 cup corn starch
1 cup all-purpose flour
1 tablespoon baking powder
¾ tablespoon salt

Vegetable Filling

5 tomatoes, seeds removed
2 green bell peppers, sliced
1 large onion, sliced
2 tablespoon vinegar
1 tablespoon olive oil
Salt and pepper to taste

Method:

Pie/Cake Batter

Mix all the ingredients in the mixer and set aside.

Vegetable Filling

Sauteé the onion, tomatoes and bell peppers in the olive oil. Add vinegar, salt and pepper. Cook for a few minutes until the vegetables are soft not overdone.

Assembly

Preheat oven at 350F

Prepare a 9x13in oven safe dish or one 9×9 and one loaf pan by covering with parchment paper.
Spread half of the batter on the prepared pan and layer the filling on the batter.

Finish by covering the vegetable filling with the other half of the batter.

Bake the pie/cake in the preheated oven for approximately 50 minutes or until a wooden toothpick inserted comes out clean.

Remove from the oven, let it cool down before cutting the pie/cake.

Serve warm or cold.

If you enjoy this recipe you might want to check the one the Easy Blender Chicken Pie.

Thank you for stopping by Simple Recipes [dot] Me and have a great week!