1

Sourdough No-Knead Bread

Nothing is more comforting than home baked sourdough bread, crispy and slightly chewy…

Before I start, I must admit that I almost gave up on the sourdough starter, not to mention the frustration and the defeat feeling and on top of it I really felt insulted since I had so much training in microbiology laboratory.  Well, determination won the case…and I finally cultivated a few jars of very healthy sourdough starter.  Therefore with all my “manipulations” and add a bit here, take a bit there, I am not sharing a recipe for the starter…as you can easily search on the internet and look for a recipe that best suit you.

What I am sharing with you is the wonderful bread that I made with the sourdough starter…just bear in mind that my sourdough starter has 100% hydration, meaning that the weight of flour and water is exactly the same.

This particular recipe has 85% hydration, therefore the dough is very “wet”, you can easily adjust to less hydration such as 83%, which will make it easier to handle.

Ingredients:

  • 90 g of sourdough starter
  • 300 g bread flour (100g plus 200g)
  • 5 g salt

Method:

The day before baking the bread, mix together the sourdough starter with 100g bread flour and 100g water.

Let the mix at room temperature for about 10 hours or overnight.

After the “incubation” time add 130g water, the remaining 200g bread flour and the salt.  Mix well and proceed as described here.

If you enjoy this no-knead sourdough bread, you might want to take a looks at the No-Knead French Baguette recipe.

Did you know that sourdough dough is fermented by a combination of wild yeast and lactobacillus? Lactobacillus is the bacillus used to produce yogurt, sauerkraut, cheese and other fermented food products.

Thank you for stopping by Color Your Recipes…have a colorful day!


Dark Rye and Flaxseed Sandwich Bread

Don’t you love when you have a bite of bread and you cannot tell that it is a “healthy version” of it?

Well, I found the perfect combination of dark rye and flaxseed meal in this recipe. If it was not for the color and the little flaxseed meal specks you would not say that this sandwich bread contains “healthy ingredients”, in another words, if you close your eyes and eat the bread you would definitely say that it is “white” bread…

Because we like so much bread, I am constantly testing different ratios between white flour and “so-called” healthy flours therefore feel less guilt when gobbling through a loaf of bread…the big challenge is for the bread to looks of whole grain and taste like white bread.

Since rye flour and flaxseed meal contain less and no gluten I had to replace the “missing” gluten so it will not compromise the formation of air bubbles which triggers the dough to raise.

This recipe will make 2 loaves, and to achieve perfect square loaves I baked them in these USA Pullman Loaf Pan.

Ingredients:

Water roux or Tangzhong

  • 50 g bread flour
  • 250 ml water

Dark Rye and Flaxseed Dough

  • 550 g bread flour
  • 60 g dark rye flour
  • 30 g flaxseed meal
  • 80 g sugar
  • 8 g salt
  • 8 g yeast
  • 8 g vital wheat gluten
  • 50 g whipping cream
  • 160 ml water
  • 60 g butter (room temperature)

Method:

Water roux or Tangzhong

In a small pan, mix all the ingredients of water roux, place in a low heat and stir constantly until the temperature reach 65C (150F), or if you do not have a thermometer, cook until ripples form. Set aside to cool by covering with a plastic film. Please see here.

Dark Rye and Flaxseed Dough

Place all the cooled water roux and all the ingredients listed under rye dough into a mixer except for the butter. Mix until all the ingredients are together, it will slightly sticky.

Increase the speed to number 2 and continue to mix for 5 minutes.

Add the butter and continue the mixing until the dough is smooth and comes out of the mixing bowl, this will take approximately 15 minutes. You will notice that the dough will no longer be sticky.

Place the dough into a medium to large bowl. Cover and let it proof until the size triple from the original size.

Now it is time to shape the dough…

Knock back the dough and split into approximately 8 little balls and let it rest for 5 minutes on the counter.

Flatten the ball making sure that the air is removed and fold into thirds, then roll it like a Swiss roll.

Place the Swiss rolls into the Pullman (4 each) pan and let it rise until triple of its original size.

Cover the pan and bake in a preheated oven of 350F for approximately 25 minutes.

Remove from the oven and flip the bread into a wire rack to cool. Slice according to your like.

Store the bread in an airtight container.

If you enjoy this Asian inspired bread recipe you might want to look at Sweet Milk Bread with Raisin recipe.

Did you know that gluten is formed when these two proteins glutenin and gliadin form a bond? Moreover, gluten gives bread a chewy texture and traps carbon dioxide during fermentation.

Thank you for stopping by Color Your Recipes…have a colorful week!


Garlic Bread

Using your leftover French or Italian bread you will be able to create these aromatic, flavorful garlic bread. These are great just with your salad, pasta or just as an appetizer.

Before going to the recipe I hope you all had a great time with your family and loved ones…right after the New Years we took off to Cancun…where we had a great time and enjoy our “together” time, therefore my “silence” for a couple of weeks…we are now back to routine and yes, looking forward to a wonderful year ahead…

Okay, now back to the recipe…today I am sharing with you a simple recipe to make tasty garlic bread…using left over baguette or Italian bread.  It is so good when just out of the oven…buttery and garlicky…perfect with salad or a bowl of soup.

I often store sliced leftover baguettes in the freezer and when I feel like making this garlic bread/toast, I make the mix of butter/garlic and in no time we are ready to savor this garlic fragrant bread…oh so good!

Ingredients:

small loaf of stale French baguette or Italian bread

  • 2 garlic cloves, finely chopped
  • 2 tablespoons butter, unsalted
  • ¼ teaspoon salt
  • 2 tablespoons finely chopped parsley
  • 1 teaspoon olive oil

Method:

There is no secret and almost no recipe…just mix together butter, parsley, garlic, olive oil and salt.

Spread the butter garlic mix on slices of baguette, approximately 2cm (¾ inch) and take to pre-heated oven of 350F for approximately 15 minutes of until golden. Just keep you eye on it, as you do not want the garlic to burn.

Serve hot or warm.

Next time you have some leftover French or Italian bread make sure to try this…

Garlic is native of central Asia, and contains many nutrients such as manganese, vitamin B6, vitamin C. Some studies suggest that garlic might have cardiovascular benefits due to its antioxidant and anti-inflammatory properties.

Thank you for visiting Color Your Recipes…have a colorful week!


Homemade Crackers

This is an easy and simple recipe to have always fresh crackers and the fun thing is that you can spike with whatever herbs or spice you want.

First of all I hope you all had a great Thanksgiving with your love ones…my “couple” weeks off turned out to be almost one month…I was on vacation in Taiwan for 2 weeks and then I got sick right after getting back…so I decided to rest and put everything on hold. Thankfully I am back on my feet and so happy to be functioning as usual…with all that said, this supposed to be a simple post, but end up being so long…forgive me…I usually like to be brief knowing that everyone is so busy and just want to get straight to the point…

I got an invitation from HOPE FOODS to try their hummus and decided to make some crackers to go with it…so before I continue I would like to let you know that I got these hummus free of charge and I did not receive any compensation for this post and all the content and opinion in this post are solely mine.

HOPE hummus are organic and they come in a variety of flavors from avocado to chocolate, yes you read it right “chocolate”. I decided to try Spicy Avocado and Thai Coconut Curry Hummus…both were slightly spicy and so tasty…I especially like the Thai Coconut Curry Hummus maybe because it was very different. I was planning to use the hummus to make some dish, but we end up eating it all with homemade crackers and vegetables, this must tell you how much we enjoy it. I hope you get a chance to try…

With the holidays approaching, it is always good to have easy and flexible food around the house…and crackers are a “must have” for any gathering. Crackers go well with cheese, dips, jams, salad, you name it…and to think that homemade crackers are so easy to make, the recipe is pretty much the same as making bread, as a matter of fact when making bread sometimes I take half of the dough and add herbs, spices, whatever I feel in the mood to add in the crackers. So in one mixing I will have a loaf of bread and crackers…

Now, if I am planning to make crackers only I will substitute the butter for olive oil…so here is the basic recipe for homemade crackers, please feel free to mix and match all kind of flours such as rye, whole wheat, oat, flaxseed and so on.

Ingredients:

  • 500 g bread flour or mixture of various flours
  • 6 g salt
  • 6 g yeast
  • 30 g sugar
  • 60 g olive oil
  • 250 g water

Method:

In the mixing bowl add all the ingredients and mix until a smooth ball forms.

Divide the dough into half or thirds, depending on how many “flavors” you want.

Now the fun part…”coloring” or flavoring your dough…here are some examples and please feel free to mix and match…fresh finely chopped rosemary, oregano, thyme or any other herb, celery seeds, cumin, cardamom, ground pepper, curry powder, fennel seeds, smoked paprika, turmeric…and so on…the options are endless…

Add the amount of desired flavors to the dough and knead until they are all well incorporated.

Let the dough rise until it doubles of its original size.

Flat the dough (approximately 175 to 200g) using a rolling pin, as thin as you can on a silicone mat (42 x 30cm or 16 x 11.5 in). Cover and let it rest for approximately 20 to 30 minutes. Just before baking, punctuate the cracker sheet with fork to avoid air bubbles during baking. If desire, spray the cracker sheet with water and sprinkle sea salt.

Bake the cracker sheet in a preheated oven of 325F for approximately 10 to 15 minutes or until golden. Make sure to check often as the thin dough can burn very easily.

Let the cracker sheet cool in a wire rack. Break the cracker sheet randomly and store in an airtight container.

If you feel that the crackers are not totally crisp after cooling. Turn the oven to 300F and place only the crackers that need more baking for approximately 10 minutes and turn the oven off and leave the crackers inside until dry. Let it cool and store.

I hope you get to try making these crackers since they are so flexible…


Thank you for visiting Color Your Recipes…have a colorful week!


Black Sesame Swirl Pumpkin Bread

This is a fun bread to bake using tangzhong method. It is so tasty with swirls of sesame paste in a pumpkin dough…and stay fresh and soft for days.

This is a fun recipe to make, especially that is Halloween…the combination of the sweet sesame swirl in between the soft, cottony pumpkin bread is just divine. Initially, people find a little skeptical because of the “black” swirl in the bread…no it is not mold…

The combination of the colors as well as the rolling and folding makes this recipe a fun process from the beginning to the end. But, don’t let me dictate how you should roll and fold…go ahead and handle the dough and the sesame filling however you wish.

Oh! Before I forget, I will be out for a couple of weeks and I am not sure if I will be able to “visit” you during this time, but I will make sure to catch up with you once I am back…

Ingredients:

Tangzhong or water roux

  • 15 g bread flour
  • 75 ml water

Bread dough

  • 300 g bread flour
  • 40 g sugar
  • 3 g salt
  • 4 g yeast
  • 125 g pumpkin puree
  • 15 g dry non-fat milk
  • 30 ml water
  • 30 g butter

Black sesame filling

  • 45 g sesame paste
  • 30 g sugar
  • 10 g all-purpose flour
  • 7 g corn starch
  • 45 g water
  • 10 g butter

Method:

Black Sesame Filling

In a small pan add the sesame paste, sugar, flour, corn starch and water. Mix well and cook under medium heat until a ball forms.

Remove from the heat and add the butter. Mix well until all the butter is incorporated into the sesame dough.Let is cool.

Set two sheets of plastic film and place the sesame dough in the middle. Gently roll the sesame dough with a roller pin to form a thin square of approximately 20 x 20cm.

Place the sesame sheet in the freezer until it is time to use as a bread filling/insert. For this particular recipe I used half of the sesame sheet.

Tangzhong or water roux

Whisk together the water and the flour until the mixture is well blended and free of lumps.

Stir the mixture while it cooks over the medium heat to reach 65C/150F. It takes about 2-3 minutes. Continue whisking until the mixture starts to thicken. The mixture of flour will have “lines”.

Remove from the heat.

Transfer to a bowl, cover with a plastic film to avoid “skin” from forming.

Ready to add to the bread dough once is cool.

Water roux or Tangzhong can bend kept in the fridge for up to 48hours.

Bread dough

In the mixer, add all the water roux, and all the other ingredients, except for the butter.

Turn the machine and stir for 2 to 3 minutes, until a ball forms.

Increase the speed to “2” and let it mix for 10 minutes. The dough will be very sticky, and less sticky as the gluten forms.

Add the butter and mix for 20 minutes more. Take a small portion of the dough (like a golf ball) and stretch gently until a very thin and transparent membrane (windowpane).

If the dough tears mix for another 5 minutes until you achieve the windowpane test. The windowpane test, demonstrated that the gluten is very well developed and it will create a very light crumb. The dough should be very elastic.

Remove the dough from the mixer and place in a bowl by covering with a plastic film.

Let dough proof until the dough tripled to its original size.

Assembly

Knock back the dough and roll the dough into a rectangle of approximately 20 x 30cm. Place the sesame insert into the middle and fold the dough over. Seal the extremities and fold into third and then into half. Again roll into a 20 x 30cm rectangle. Roll like a Swiss roll and cut into 6 into the baking pan.
into the Pullman pan (23 x 10 x 10 cm) and let it rise until almost 90% to reach the rim of the pan.

Bake in a preheated oven of 350F for approximately 25 to 30 minutes.

Remove from the oven and flip the bread into a wire rack to cool.

Slice the bread after is cool.

Store the bread in an airtight container.

If you enjoy this bread recipe using tangzhong or water roux method you might want to check on Frangipane Rolls or Milk Bread with Raisin.

Did you know that sesame seeds come from a fruit called sesame? Moreover, sesame seeds come in many colors such as white, yellow, tan and black. Sesame seeds are rich in protein and good fat, which can help to lower cholesterol.

Thank you for visiting Color Your Recipes…have a colorful week!


Frangipane Toast

This toast is almost like a dessert for breakfast. The toast is covered with a layer of creamy frangipane and topped with toasted slices of almond.  Perfect with a cup of tea or coffee.

Okay, you might feel that I am cheating…this is a simple version of the Frangipane Rolls. Since we had so much frangipane rolls, I decided to use up the almond cream so it would not go bad. In this recipe I used the same dough, just in different format. I spread a generous layer of almond cream, sprinkled some sliced almond and voila…

Can I tell you a secret? I just learned when writing this post that the past tense of the verb “spread” is “spread”…so interesting as I am see myself always learning English…

Going back to the toasts…after the layer of sliced almond, I had them all packed two by two with the sliced almond facing each other (so it would not “glue” together) and together they went into a freezer bag and freezer. A week later, I just popped them into a 350F directly from the freezer to a preheated toaster oven and baked for about 15 minutes, or until the almonds were golden…just before serving sprinkled powder sugar on it and here we had in front of us an amazing toast. It was absolutely delicious…each bite came with all three layers of light and crunchy almond, creamy and fragrant almond cream, and finally a soft and cottony layer of rich bread.

As you can see, this is a no-recipe post…all the ingredients and methods can be found HERE. I hope you get to try this, as it is much easier and adaptable for our busy life.

Below is what I did…by pictures…

And the toasts are ready for your enjoyment!

Did you know that almond is a rich source of B and E vitamins? Some research papers suggest that consumption of almonds consumption can increase blood levels of HDL (high density lipoprotein, good cholesterol) and decrease LDL (low density lipoprotein, bad cholesterol)?


Thank you for visiting Color Your Recipes…have a colorful week!


Frangipane Rolls

If you love anything almond you will love this rolls. Layers of creamy frangipane in between soft and cottony bread made with tangzhong method.

Here I am with another recipe for bread…this time I made two kind of bread using the same batch of dough. This is a super versatile dough as you can all kind of rolls and buns with it, sweet or savory version and even a sandwich loaf, which I did.

This dough taste almost like brioche without all the butter…very soft and rich in flavor due to the heavy cream and eggs. Since I baked these rolls, I already used this same dough recipe for cinnamon rolls and cheese and caramelized scallion rolls…so good!

I love everything almond…and frangipane which is merely an almond cream is one of my favorite way to enjoy almond…I love frangipane in tart, pies, cake and in rolls.
Each bite of this roll is loaded with fragrant almond cream in between a soft and cottony bread dough…heavenly!

When mixing all the ingredients, initially the dough will be very “wet”, do not panic as gluten develops you will see how “miraculously” the dough will all come together in a very soft and elastic ball. As a matter of fact when the dough reach the windowpane stage, you will be able to stretch so thin as the dough is so soft.

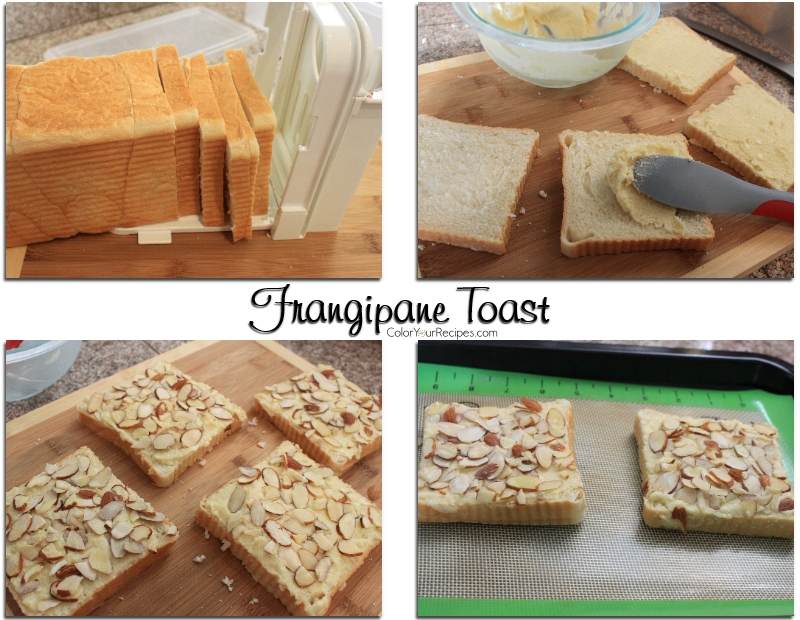
Please note that I had some frangipane left which I used to make frangipane toast…recipe coming soon.

Ingredients:

Water roux or Tangzhong

  • 40 g bread flour
  • 200 ml water

Bread Dough

  • 550 g bread flour
  • 85 g sugar
  • 7 g salt
  • 7 g yeast
  • 50 g heavy whipping cream
  • 2 eggs slightly beaten (minus 1 tablespoons, for egg wash), complete with water to reach 120g
  • 60 g butter (unsalted)

Frangipane (almond cream)

  • 200 g almond paste (store bought or homemade)
  • 2 eggs
  • 50 g butter, unsalted
  • ½ teaspoon almond extract

Topping

  • Egg wash: 1 tablespoon egg (from the dough), 2 drops of water, 1 drop vanilla extract
  • ¼ to ⅓ cup almond, sliced

Method:

Water roux or Tangzhong

In a small pan, mix all the ingredients of water roux, place in a low heat and stir constantly until the temperature reach 65C (150F), or if you do not have a thermometer, cook until ripples form. Set aside to cool by covering with a plastic film. Please see here.

Bread Dough

Place all the cooled water roux and all the ingredients listed under dough into a mixer except for the butter. Mix until all the ingredients are together, it will be slightly sticky.

Increase the speed to number 2 and continue to mix for 5 minutes.

Add the butter and continue the mixing until the dough is smooth and comes out of the mixing bowl, this will take approximately 15 minutes. You will notice that the dough will no longer be that sticky.

Place the dough into a medium to large bowl. Cover and let it proof until the size triple from the original size.

Frangipane (almond cream)

In the mixing bowl, add almond paste. Beat on medium speed, scrape the sides of the mixing bowl.

Add the eggs, one at the time and beat well after each addition. Always scrape the sides of the mixing bowl.

Add the butter and the almond extract, beat until the butter is incorporated in the cream.

Now the frangipane is ready to be use. It can be store in the refrigerator for a couple of days.

Assembling the Frangipane Rolls

Knock back the dough and weigh 550g (for the Pullman loaf) and the remaining for the frangipane rolls.

For the Pullman loaf, follow HERE.

For the frangipane rolls, roll the dough it out to form a rectangle of approximately 35x28cm (14x11in).

Spread the frangipane, leaving approximately 1cm (½ in) in the border along the wider edge.

Starting at the covered edge, roll the dough up like a Swiss roll.

Press the edges together and cut the roll into 12 slices and then place these cute side up in the pan.

Cover with clear film. Leave to rise in a warm place for 40 to 45 minutes, or until the dough slices have doubled in size.

In the meanwhile, preheat the oven to 350F.

Just before placing the buns in the oven, prepare an egg wash with the tablespoon of egg with 2 drops of water and 1 drop of vanilla extract (if desire).

Brush the top of the buns with the egg wash and sprinkle with sliced almonds.

Bake the buns for approximately 20 minutes and the Pullman loaf for 25 minutes.

Remove from the oven and flip the rolls and loaf into a wire rack to cool.

Serve the buns warm or room temperature.

Wait for the Pullman loaf to cool completely before slicing.

Store both the buns and the bread in an airtight container.

Did you know that frangipane can be used like a pastry cream? Next time baking any tart that requires pastry cream you can substitute it with frangipane.

Thank you for visiting Color Your Recipes…have a colorful week!


Matcha Swirl Sandwich Bread

This is a fun sandwich bread where layers of matcha dough can be found in each slice of bread. Tangzhong method is used in this recipe to accomplish a soft and cottony texture.

Somehow I am in the mood of rolling and twisting…and this bread is a perfect example. I made two loaves with this recipe, a matcha swirl and a black sesame swirl, but I only have the details for the matcha swirl sandwich bread.

Honestly the matcha pattern is a lot of fun and in reality is much simpler that it looks. You can roll and twist anyway you want, and I can guarantee you that no slice will look the same.

Lately, matcha has been added into all kind of food, especially drinks. What is matcha? Matcha is powdered green tea and because of the way it is grounded, drinking matcha or adding to food, means that you actually eating the green tea.

Matcha contains high levels of antioxidants and is an energy booster since contains caffeine. Many studies suggest drinking green tea may protect skin, heart and bones, therefore matcha might exhibit similar benefits.

In my opinion, the key word is “moderation”…everything should be eaten in moderation no matter what claims are.

Anyway, enough of talking…lets head to the recipe.

Ingredients:

Water roux or Tangzhong

  • 45 g bread flour
  • 225 ml water
  • 600 g bread flour
  • 60 g sugar
  • 7 g salt
  • 8 g yeast
  • 60 g half and half (or heavy cream, or water)
  • 20 g dry non-fat milk
  • 140 ml water
  • 60 g butter
  • 4g matcha

Method:

Water roux or Tangzhong

In a small pan, mix all the ingredients of water roux, place in a low heat and stir constantly until the temperature reach 65C (150F), or if you do not have a thermometer, cook until ripples form. Set aside to cool by covering with a plastic film. Please see here.

Bread dough

Place all the cooled water roux and all the ingredients listed under dough into a mixer except for the butter and the matcha powder. Mix until all the ingredients are together, it will slightly sticky.

Increase the speed to number 2 and continue to mix for 5 minutes.

Add the butter and continue the mixing until the dough is smooth and comes out of the mixing bowl, this will take approximately 15 minutes. You will notice that the dough will no longer be sticky.

In a small bowl weigh the matcha and add 1 to 1 ½ tablespoon of water and make a thick paste. Remove the dough from the mixing bowl and weigh 250g of dough . Add matcha paste to the dough and knead well until all the matcha is incorporated into the dough.

Place the doughs into 2 separate bowls. Cover and let it proof until the size triple from the original size.

Now it is time to shape the dough…

Knock back doughs and weigh 330g of the white dough. Split into 4 small balls. Split the matcha dough into 4 little balls.

Flatten the ball white dough into a square and do the same with the matcha dough, using a roller pin. Layer the matcha dough onto the white dough and roll making sure that the air is removed and roll it like a Swiss roll. Twist the roll around it. Place the rolls in a Pullman pan with lid. Repeat with the remaining 3 balls of white and matcha dough.

Let the dough rise until triple of its original size.

Cover the pan and bake in a preheated oven of 350F for approximately 25 minutes.

Remove from the oven and flip the bread into a wire rack to cool. Slice according to your like.

Store the bread in an airtight container.

Did you know that green leaves for the production of matcha are placed in shade during growth in order to slow it? Moreover, during this process, there is a stimulation of chlorophyll production, turning the leaves into a dark green.

Thank you for visiting Color Your Recipes…have a colorful week!


Esfiha – Baked Meat Pie

This is a very popular snack found in Brazil, it is mainly another version of our “hamburger” the ground meat baked wrapped in a bread dough.

Sorry for being away…this couple of weeks so much has happened in my life…one of my very good friends has stopped all the treatments for cancer, therefore she is under palliative and hospice care, with the support of my husband I flew with her out of state to help and spend some time with her along with her family. During the time I was with her, we talked and talked, we laughed and cried, we remembered facts in the past, places we went together, we teased each other…and we comforted each other…it was so hard to say goodbye when was time for me to come home, but she was always very gracious and comforting, telling me that she was okay and that I could leave and not to worry about her. It was an experience that I have never imagined going through…it was a life lesson, being able to face death openly and accept that we all one day will have to come across with. As for now, we still communicate by text and phone, and I am so thankful that she is in such a good spirit, very peaceful, serene and enjoying every day.

I hope I did not spoil your day by sharing this event…now the bright side of my post…a recipe for esfiha, which are simply meat pies. Esfiha are very popular in Brazil. These meat pies are of Middle East origin and they are found everywhere, a very common street food. They can be open-faced, like pizza and topped with cheese, lamb, beef or vegetables.

What I have here is a closed one, and for the dough I used an Asian inspired recipe, therefore the bread dough is super soft and cottony as compared to the recipe that I originally posted HERE…no more ”talk” and let’s head for the recipe. By the way, these meat pies are so tasty and juicy, they can be frozen, and are great as an appetizer or as a main dish served with a side salad. One more thing…they are usually served with hot sauce or wedge of lime/lemon.

Ingredients:

Dough, from HERE

Meat Filling
1 lb 85% fat ground beef
2 tomatoes, seed removed and chopped
1 medium onion, chopped
¼ teaspoon ground all spice
½ cup fresh parsley, finely chopped
1 tablespoon olive oil
Salt and pepper to taste

Egg Wash
1 egg
½ tablespoon water

Method:

In a large mixing bowl combine the ground meat and all the other ingredients, mixing them together. Set aside in the refrigerator for approximately 2 hours. Remove the excess of liquid. Mix again gently and it is ready for the assembly.

Assembly:

After the first rise, divide the bread dough into small balls, approximately 45 to 50 g each. Roll into small circle of about 12 cm or 5 inch in diameter.
Place in the middle of the circle approximately 2 tablespoons of the meat mixture.
Fold the circle into thirds, forming a triangle shape pie. Seat the ends and place them on a cookie sheet lined with a silicone mate or parchment paper.

Preheat oven to 350F.

Cover the pies and let them rise for approximately 30 minutes or until the pies double of its original size.

Gently brush the top of the pies with the egg wash.

Bake the pies in the preheated oven for 25 minutes, or until the top is golden brown. Please note that some of the filling might “leak” and it should be bubbling.

Remove from the tray and let it cool on a wire rack. Serve warm with hot sauce and/or lemon/lime wedge.

Did you know that esfiha is also called sfiha in Arabic? It means meat with dough. In Brazil, esfiha is very popular due to the presence of a large Arab population.

Thank you for visiting Color Your Recipes…have a colorful week!