1

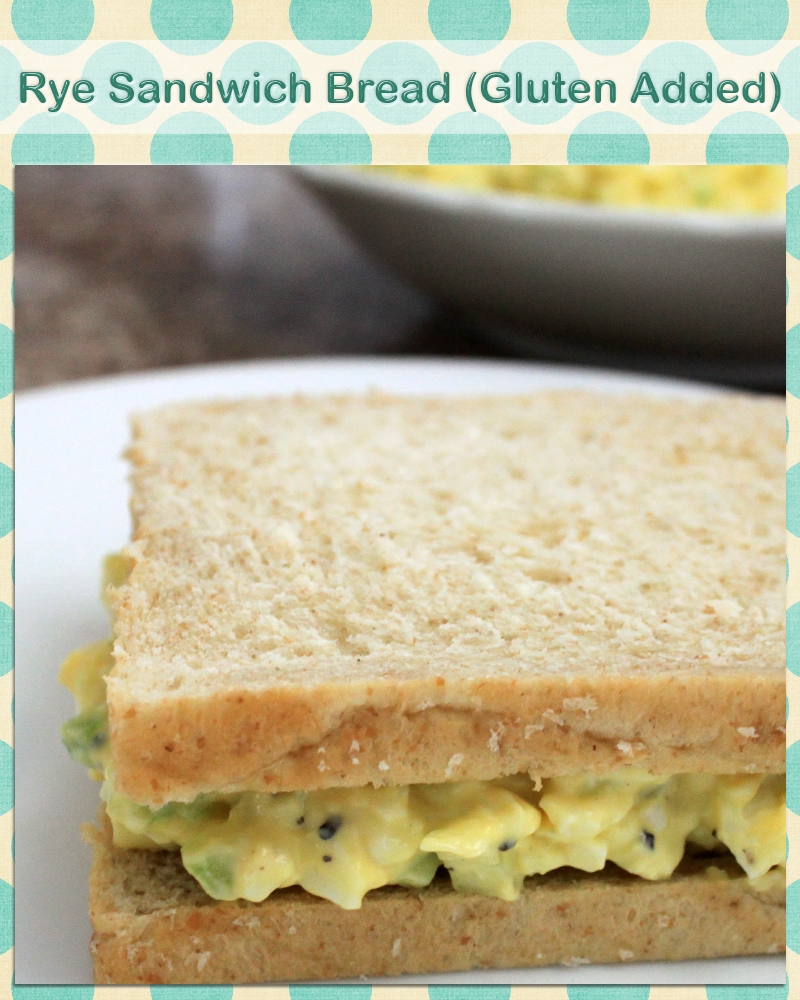
Rye Sandwich Bread with Gluten

This is an Asian inspired sandwich bread made with rye and a bit of gluten. Because I use tangzhong or water roux in the dough, the bread stay soft and cottony for days.

First of all, I hope you all had a great Memorial Day weekend and had a chance to take a moment to remember all the people that fought for our freedom…

This week I am sharing a recipe that is adapted from the one that I posted here. I decide to add some gluten to make the dough a bit pliable, for the horror of the gluten free dieters. Sorry it is nothing personal, since we do not have any problem with gluten I decided to “abuse” a little.

The original recipe that I used was pretty good, but the addition of gluten made it softer and silkier. Since rye flour contains less gluten it was logical just to replace the “missing” gluten as it was for using regular flour. With all this said, I can assure you that if you close your eyes and bite into this bread you will never say that the bread was made with rye flour.

The good thing is that all the goodness of rye flour will not compromise the texture of this bread.

Ingredients:

Water roux or Tangzhong

  • 50 g bread flour
  • 250 ml water

Rye Dough

  • 550 g bread flour
  • 100 g dark rye flour
  • 90 g sugar
  • 8 g salt
  • 8 g yeast
  • 5 g vital wheat gluten
  • 120 ml whipping cream
  • 90 ml water
  • 60 g butter (room temperature)

Method:

Water roux or tangzhong

In a small pan, mix all the ingredients of water roux, place in a low heat and stir constantly until the temperature reach 65C (150F), or if you do not have a thermometer, cook until ripples form. Set aside to cool by covering with a plastic film. Please see here.

Rye Dough

Place all the cooled water roux and all the ingredients listed under rye dough into a mixer except for the butter. Mix until all the ingredients are together, it will slightly sticky.

Increase the speed to number 2 and continue to mix for 5 minutes.

Add the butter and continue the mixing until the dough is smooth and comes out of the mixing bowl, this will take approximately 15 minutes. You will notice that the dough will no longer be sticky.

Place the dough into a medium to large bowl. Cover and let it proof until the size triple from the original size.

Now it is time to shape the dough…

Knock back the dough and split into approximately 8 little balls and let it rest for 5 minutes on the counter.

Flatten the ball making sure that the air is removed and fold into thirds, then roll it like a Swiss roll.

Place the Swiss rolls into the Pullman (4 each) pan and let it rise until triple of its original size.

Cover the pan and bake in a preheated oven of 350F for approximately 25 minutes.

Remove from the oven and flip the bread into a wire rack to cool. Slice according to your like.

Store the bread in an airtight container.

For more bread recipes, please check HERE.

Did you know that gluten is formed when these two proteins glutenin and gliadin form a bond? Moreover, gluten gives bread a chewy texture and traps carbon dioxide during fermentation.

Thank you for visiting Color Your Recipes…have a colorful week!


Star and Flower Shaped Toasts

This is a simple and fun way to make toast. It is cute and it will bring smiles.

Do you like toasts? I mean the ones that are crispy and crunchy and are stored inside an airtight container. The kind which you can spread pate, brie cheese, jam and so on…they are so basic and are delicious with either sweet or savory spreads…and all kind of cheese as well. They make great appetizer as well and are usually sold as “mini toasts”.

I love to have these toasts available all the time so when I saw these molds on Amazon I could not resist in getting it…so this week I am sharing the dough that I used for these molds. Moreover, you can make all kind of bread and shape them as you like by using one of the three molds.

By the way, on my last week post I served the egg salad with ham and celery on these star shaped toasts.

Ingredients:

Water roux or Tangzhong

  • 20 g bread flour
  • 100 ml water

Dough

  • 300 g bread flour
  • 40 g sugar
  • 8 g salt
  • 20 g dry milk powder
  • 4 g yeast
  • 4 g salt
  • 1 egg, approximately 51g or 50g heavy cream
  • 45 to 50 ml water or milk
  • 20 g butter (room temperature)

Method:

Water roux or Tangzhong

In a small pan, mix all the ingredients of water roux, place in a low heat and stir constantly until the temperature reach 65C (150F), or if you do not have a thermometer, cook until ripples form. Set aside to cool by covering with a plastic film. Please see the recipe in this post.

Dough

Place all the cooled water roux and all the ingredients listed dough except the butter into the bread machine (I use the Zojirushi from HERE) and set to knead. Mix until all the ingredients are together, it will be very sticky. Do not attempt to add more flour. Once the gluten form, it will not be so sticky.

Add the butter when the machine beeps and continue the kneading cycle. Once the cycle ends, start the machine again under kneading cycle, totaling to 2 kneading cycles. After the end of the second kneading cycle the dough will achieve the window pane stage.

You will notice that the dough will no longer stick to the wall of the mixing bowl.

Place the dough into a medium to large bowl. Cover and let it proof until the size double from the original size.

Remove the dough from the bowl and divide the dough my weighing 240g for the star shape mold and 290g for the flower shape mold.

Flatten the ball and shape like a Swiss roll and place into each mold and let it rise until almost 90% to reach the rim of the pan.

Cover the mold and bake for approximately 20 minutes.

Remove from the oven let it cool on a wire rack for 15 minutes. Gently tap the mold and loose the bread. Remove the bread from the mold and transfer to a wire rack until completely cool.

Slice when the bread it totally cool.

Serve as it is or toast in a preheated oven of 275F until crunchy and golden. Once cool store in airtight container.

I you enjoyed this bread recipe you might want to check on these other bread recipes HERE.

Did you know that the browning of the bread is called “Maillard reaction”? Maillard reaction or browning of food occurs when proteins and sugar are exposed to heat. Maillard reaction occurs in cooking with almost all kinds of food, from baking bread, roasting meat to frying chicken.

Thank you for stopping by Color Your Recipes…have a colorful week!


Rye Sandwich Bread

Simple recipe for Asian inspired rye sandwich bread using tangzhong or water roux method. The bread is cottony and fluffy and stays soft for days.

We love bread, and I love baking bread…and yes, I know that too much bread is not good, especially the ones that uses only white flour, therefore I try to balance them by using “healthy” flours in my bread baking trek. Honestly, I still like my white bread the best…you know what I mean…the ones that use only white flour…I know…somehow I still have to find a recipe that uses “healthier” flour and gives me the same texture of a white bread…

This recipe is pretty good, I incorporated rye flour into the dough. Because rye contains less gluten, it was expected that the dough will not rise as much…and indeed it did not. Nevertheless the texture was acceptable. I made two loaves, one we used as regular sandwich bread and the other I made them into toasts, which were great.

So if you care to add a bit of extra soluble fibers into your slice of bread, rye is a good alternative.

Ingredients:

Water roux or Tangzhong

  • 35 g bread flour
  • 175 ml water

Rye Dough

  • 400 g bread flour
  • 200 g dark rye flour
  • 90 g sugar
  • 7 g salt
  • 8 g yeast
  • 120 ml whipping cream
  • 90 ml water
  • 60 g butter (room temperature)

Method:

Water roux or Tangzhong

In a small pan, mix all the ingredients of water roux, place in a low heat and stir constantly until the temperature reach 65C (150F), or if you do not have a thermometer, cook until ripples form. Set aside to cool by covering with a plastic film.

Rye Dough

Place all the cooled water roux and all the ingredients listed under rye dough into a mixer except for the butter. Mix until all the ingredients are together, it will slightly sticky.

Increase the speed to number 2 and continue to mix for 5 minutes.

Add the butter and continue the mixing until the dough is smooth and comes out of the mixing bowl, this will take approximately 15 minutes. You will notice that the dough will no longer be sticky.

Place the dough into a medium to large bowl. Cover and let it proof until the size triple from the original size.

Now it is time to shape the dough…

Knock back the dough and split into approximately 8 little balls and let it rest for 5 minutes on the counter.

Flatten the ball making sure that the air is removed and fold into thirds, then roll it like a Swiss roll.

Place the Swiss rolls into the Pullman (4 each) pan and let it rise until triple of its original size.

Cover the pan and bake in a preheated oven of 350F for approximately 25 minutes.

Remove from the oven and flip the bread into a wire rack to cool. Slice according to your like.

Store the bread in an airtight container.

If you enjoy this Asian inspired bread recipe you might want to check on my Recipe Box under Bread.

Did you know that rye is a good source of soluble fiber? Rye contains lower gluten than wheat flour due to its higher levels of gliadin and lower levels of glutenin.

Thank you for stopping by Color Your Recipes…have a colorful week!


Cheddar Bacon Green Onion Scone

These scones are packed with flavors…cheese, bacon and green onion. They are flaky, light and great at anytime.

I love the idea of having these savory scones in the freezer for a quick and fast snack when I am craving for something salty, they are very versatile, as you can serve them for brunch, with salad, the options are countless…

These are fluffy, light and so tasty especially with the melting Cheddar cheese…yum! You can shape them whichever you like, make them big or small. And yes, my scones came out pale…next time making them I will brush them with egg wash before placing them in the oven…

Ingredients:

  • 250 g all-purpose flour
  • 1 tablespoon baking powder
  • ¼ teaspoon salt
  • ¼ teaspoon granulated sugar
  • 60 g cold unsalted butter, cut into approximately 12-mm cubes
  • 125 ml buttermilk (or milk)
  • 1 large egg, cold
  • 110 g Cheddar cheese, grated
  • 3 spring green onion chopped
  • 5 strips bacon, diced or bacon bits
  • Milk or egg wash to brush scones

Method:

Preheat the oven at 350F

Place the bacon into a non-stick frying pan and cook until beginning to crisp. Remove the bacon and place on paper towel to remove the excess of grease and allow to cool.

Cut the butter and place in the freezer while you are measuring the other ingredients.

Measure the buttermilk or milk and add the egg, keep in the refrigerator until needed.

In a food processor bowl, place the flour, salt, sugar and baking powder. Pulse for a few times.

Add the butter pulse until the mixture resembles coarse meal and no pieces of butter are larger than a pea.

Pour the buttermilk mixture into the flour mixture, and pulse until a dough forms.

Remove the dough from the bowl and place in a lightly flour surface. Add the bacon, cheese and spring onion and gently kneading it onto itself for a few times. Do not over mix or knead…gently fold the dough.

Pat the dough into circle of 2 cm thick. Cut the circle first into half, then into quarters until you reach 8 slices. Place the scone gently in a baking sheet with parchment paper.

Brush the top of the scones with milk or egg wash.

Bake for approximately 15 to 18 minutes, until the scones are slightly golden, somehow mine turned out to be very pale. Rotate the pan halfway through baking.

Allow the scones to sit in the pan for a few minutes before transferring to a wire rack to cool

Serve warm. Store the “leftover” scones in the freezer for later enjoyment.

To warm the frozen scones, place the scones in a 350F preheated oven for about 5 minutes.

If you enjoy this recipe for scones, you might want to check on the this Bacon Cheese Bread with Green Onion recipe.

Thank you for stopping by Color Your Recipes…have a colorful week!


No-Knead Bread Two Ways…Stretch and Fold

This is a very simple way to make bread…no-knead using simply stretch and fold. The bread is light and loaded with air pockets.

I hope you all had a great Thanksgiving…the recipe that I am sharing today is very simple to put together, and come handy especially during holiday season as everyone is busy shopping and cooking…this bread can be stored in the freezer and ready to serve in a blink.

Before I start, have you ever heard of “stretch and fold” technique method of bread dough?

Well, this is a very simple technique where you literally stretch and then fold the dough. This is a super easy and simple method to accomplish great results. So, instead of the traditional physical workout kneading the bread dough, in case you do not use a mixer, you only gently stretch the dough and fold it to the center during the initial proofing stage.

I used the no-knead method and try them in both way…the conventional way, leave the dough until ready to shape and by incorporating the “stretch and fold” technique during the first hour of the proofing.

As you can see by the pictures below, adding a simple “stretch and fold” the bread has a better structure because the dough develops nicer gluten strands, therefore more air and larger air pockets.

Better flavor? To me it was hard to tell, but I love the idea of more uneven air pockets. And it was definitely easier to shape since the dough was kind of “self contained” after the stretch and fold technique was applied.

After this experiment, I sure will use this simple technique when baking no-knead bread. The ratio between water and flour used in this recipe was the same as used HERE, 80% hydration.

Ingredients:

  • 160 g water
  • 200 g bread flour
  • ½ teaspoon salt
  • ½ teaspoon yeast

Method:

Mix all the ingredients in a medium bowl.  The dough will be soft and very sticky. Cover the bowl and place in a warm place.

For the “regular method” you can read HERE, as for the “stretch and fold” method, during the first two hours “stretch and fold” every half hour.

How to “stretch and fold”: Using a wet hand, scrape a section of the dough (approximately ¼), lift and stretch it, then fold into the center of the bowl. Repeat 3 more times, ¼ at the time, 20 minutes in between.

After 4 sessions of “stretch and fold” let the dough rest for 10 to 12 hours.

When ready to bake, gently remove the dough from the bowl over a floured surface and split the dough into approximately 2 portions.

Fold the dough over itself and roll as you push out until elongated in the form of baguette. Repeat with the other dough.

Place the baguettes on a cookie sheet on a floured parchment paper. Dust the top of the baguette with flour and gently cover the baguettes with a plastic film.

Leave to rest for approximately 1 to 1 ½ hour or until almost double from its original size.

Preheat oven to 550F (or as high as your oven will permit). Place a pan with water on the bottom rack of the oven.

Use a sharp scissor cut the bread making diagonal marks of approximately 45 degree, make sure to tuck in the tips.

When ready to place the baguettes in the oven spray the baguettes generously with water. Let it bake for 5 minutes and repeat the water spray. Another 5 minutes in the oven and spray again with water and turn the pan around so the baguettes bake evenly. Let it bake for another 5 minutes or until the crust turns brown.

For the “regular method” I made two baguettes as for the “stretch and fold” dough I made one baguette and 4 small rolls.

I hope you enjoy this simple method for homemade bread.  For more bread recipes you might want to take a look here.

Thank you for visiting Color Your Recipes…have a colorful day!


Pumpkin Cheese Pull-Apart Bread

This is an Asian inspired recipe for soft, light and cottony savory pumpkin bread with cheese in between. It is fun to just pull-apart and savor it.

Pumpkin and cheese? Why not? As always I love baking bread, and most of the time (not always) I feel guilty using regular wheat flour…somehow I not a big fan of whole wheat, and I am always trying to find a healthier” version for bread…now I found a solution for it…pumpkin pure…

Pumpkin pure can be easily added to the bread dough without any fuss…and if I do not emphasize it, you might not even notice the presence of the pumpkin…well, that might not be true…because of the vibrant yellow…which gives a nice and healthy look to the loaf.

Now going back to pumpkin and cheese…who said that pumpkin yeasted bread has to be always “sweet”? Well, I can guarantee you that once you try this bread you will definitely change your mind…

Please note that in this recipe I used the Kitchen Aid mixer and the USA loaf pan, which is my favorite, no need to oil and the bread always come out so easily.

Ingredients:

Water Roux or Tangzhong

  • 35 g bread flour
  • 175 g water

Main dough

  • 600 g bread flour
  • 180 g pumpkin puree
  • 80 g sugar
  • 45 g dry milk
  • 8 g sea salt
  • 10 g dry yeast
  • 2 to 3 tablespoons heavy cream
  • 60 g butter

Cheese Filling

  • 250 g grated cheddar cheese
  • 2 green onions finely chopped
  • 1 ½ tablespoon butter, melted

Method:

Bread Dough

Water roux
Whisk together the water and the flour in a small pan until the mixture is well blended and free of lumps.

Stir the mixture while it cooks over the medium heat to reach 65C/150F. It takes about 2-3 minutes. Continue whisking until the mixture starts to thicken. The mixture of flour will have “lines”.

Remove from the heat.

Transfer to a bowl, cover with a plastic film to avoid “skin” from forming.

Ready to add to the bread dough once is cool.

Water roux or Tangzhong can bend kept in the fridge for up to 48hours.

Dough
Place all the cooled water roux and all the ingredients listed under main dough into a mixer except for the butter. Mix until all the ingredients are together, it will be sticky.

Increase the speed to number 2 and continue to mix for another 2 minutes until the dough is smooth.

Add the butter and continue the mixing until the dough is smooth, elastic and comes out of the mixing bowl, this will take approximately another 10 to 15 minutes. You will notice that the dough will no longer stick to the wall of the mixing bowl and pass the window pane test.

Place the dough into a medium to large bowl. Cover and let it proof until the size double from the original size.

Knock back the dough and split into 2 portions (approximately 600 g each) and let it rest for 5 minutes on the counter.

Roll one piece of the dough out to form a square of approximately 27 x 27 cm (11 x 11 in).

Brush the dough with the melted butter for the filling and sprinkle it with the green onion and cheese.

Cut into three equal trips. Stack onto of each other and cut across six equal strips. Layer the squares into the loaf pan like a book. Do the same with the remaining dough.

Cover pan with the towel and let rest in a warm place for another 45 minutes or until doubled in size.

Layer the squares into the loaf pan like a book. Cover pan with the towel and let rest in a warm place for another 45 minutes or until doubled in size.

Preheat the oven to 350F and place pan onto the middle rack in your oven. Bake for 30 to 35 minutes or until the top of your loaf is dark brown.

Remove from the oven and let rest for 15 minutes on a wire rack. Loosen the edges around the loaf and invert it onto a wire rack.

Serve warm.

So…was I able to change your mind and make you accept pumpkin and cheese?

If you enjoy this recipe with pumpkin pure, you might want to try Pumpkin Dinner Rolls or Pumpkin Soft Cookies.

Did you know that pumpkin is loaded with antioxidants such as carotenoids? This explains its bright orange color. Pumpkin is also a great source of dietary fibers.

Thank you for stopping by Color Your Recipes…have a colorful week!


Apple Filled Little Buns

Today I am sharing you a recipe for an Asian inspired bun recipe. These buns are filled with tangy soft apple. Because tangzhong or water roux method was used in this recipe, the little buns stay fresh and soft for days.

Yes, here I am with another simple recipe for bread…this time I decided to make a lighter version of bread dough as compared to the sweet dough. In spite of no heavy cream and less fat, this bread still turned out to be very light and fluffy…

With this one recipe I made two kind of bread, my usual Pullman sandwich loaf and buns filled with freshly cooked apple filling…yes, the buns turned out so good…light bread dough with sweet and a touch of tangy apple…fall is here, and this means lots of variety of apples to choose from…

I have a feeling that this bread recipe will be here to stay, especially that contain less fat and still has the same fluffiness of the other ones that I baked in the past.

In this recipe I added the butter after the gluten developed, therefore the butter did not interfere with the gluten formation, therefore the texture came out very light, fluffy and yet springy

During mixing stage, before the butter hit the bowl I was to tempted to add more flour, but was able to control myself and waited for a while…sure enough the dough eventually did not stick to the bottom of the bowl (due to gluten formation).

When adding the butter, because the gluten network has been formed already, please be aware that it will take a while until the butter incorporate into the dough…please be patience…all well worth it!

By the way, you will need a mixer (I used my Kitchen Aid mixer) for this recipe, as the dough is very sticky and hard to handle. Here is the recipe, and indeed it is a very simple one, just make sure that you weight all the ingredients…I hope you get to try this one…oh! Both the sandwich loaf and the apple buns stay fresh for many many days…

Ingredients:

Water Roux or Tangzhong

  • 35 g bread flour
  • 175 g water

Main dough

  • 2 eggs slightly beaten minus 1 ½ tablespoons (use as egg wash)
  • 600 g bread flour
  • 90 g sugar
  • 50 g dry milk
  • 8 g sea salt
  • 8 g dry yeast
  • 120 ml water
  • 60 g butter

Apple Filling

  • 450 g Jazz apples, peeled and cut
  • 100 g sugar
  • 1 tablespoon lime or lemon juice
  • ½ teaspoon vanilla extract
  • 100ml water

Method:

Apple Filling

Soak the cut apple in a bowl of water with some lemon or lime juice

Drain and place the apple in a medium pan. Add the sugar, lemon or lime juice and water. Cook under high heat until boiling. Turn the heat to low and cook until most of the water is evaporated.

Add the vanilla extract and remove from the heat.

Let it cool completely before using on the dough.

Bread Dough

Water roux

In a small pan, mix all the ingredients of water roux, place in a low heat and stir constantly until the temperature reach 65C (150F), or if you do not have a thermometer, cook until ripples form. Set aside to cool by covering with a plastic film.

Dough

Place all the cooled water roux and all the ingredients listed under main dough into a mixer except for the butter. Mix until all the ingredients are together, it will be very sticky.

Increase the speed to number 2 and continue to mix for 5 to 10 minutes, until all dough comes out from the bottom of the mixing bowl.

Add the butter and continue the mixing until the dough is smooth and comes out of the mixing bowl, this will take approximately another 10 to 15 minutes. You will notice that the dough will no longer stick to the wall of the mixing bowl and pass the window pane test.

Place the dough into a medium to large bowl. Cover and let it proof until the size double from the original size.

Divide the dough into approximately 550g and 640g. Use the 550g for the Pullman loaf.

With the 640g dough, using a rolling pin shape the dough into a rectangle of approximately 28 x 38cm. Spread the apple filling evenly on the dough. Roll it like when making cinnamon rolls.

Cut into approximately 16 pieces. Place the rolls into a muffin pan.

Cover and let the buns proof until double its original size.

When ready to bake, use the leftover egg as an egg wash (add 1 teaspoon water) and brush gently on the buns.

Bake in a preheated oven at 350F for approximately 15 to 20 minute, until slightly golden brown.

Remove from the oven and transfer to a wire rack.

Serve warm or at room temperature.

If you enjoy this Asian inspired recipe of bread, you might want to take a look at Sweet Milk Bread with Raisin or Matcha Swirl Sandwich Bread recipes.

Thank you for stopping by Color Your Recipes…have a colorful week!


Basic Sweet Bread Dough (Water Roux or Tangzhong Method)

This is an Asian inspired recipe for a soft, cottony and fluffy bread.  The dough is very rich because of the heavy whipping cream in it.  It is great as a loaf or as a base for all kind of rolls and bread.

First of all, I want to apologize for the long time away from blogging…I hope you are all well and did not give up on me…I was literally very busy in the past months and after things got under control we went for a short vacation…now I am back and hope to pick up where I left…as you might know I love bread and since I started blogging, baking bread has been one of my many passions…

After playing with many recipes and baking tons of bread, one after another one, I started to feel very critical, and was not content with one particular recipe until I came up with this one, which I now use it quite often and make all kind of bread from simple sandwich loaf bread to braided ones. Please note that this dough is very rich, lots of cream and butter, almost a lighter version of brioche. So if you are looking into a everyday bread recipe you should not use this one, as it is sure super rich.

Initially this dough is very sticky, therefore hard to handle without the help of a mixer or bread machine. As the dough mix, gluten forms, turning the dough from sticky to elastic…it is awesome watching the transformation…it is all chemistry! I sure hope you give this recipe a try.

Okay, enough of description…let’s get to the recipe!

Ingredients:

Water roux or Tangzhong

  • 35 g bread flour
  • 175 ml water

Sweet Dough

  • 600 g bread flour
  • 100 g sugar
  • 8 g salt
  • 20 g dry milk powder
  • 8 g yeast
  • 2 eggs minus 1 tablespoon for egg wash, slightly beaten
  • 50 g milk
  • 120 ml whipping cream (approximately 100g)
  • 55 g butter (room temperature)

Method:

Water roux or Tangzhong

In a small pan, mix all the ingredients of water roux, place in a low heat and stir constantly until the temperature reach 65C (150F), or if you do not have a thermometer, cook until ripples form. Set aside to cool by covering with a plastic film. Please see here (http://jzq.0e7.mywebsitetransfer.com/chocolate-marble-asian-bread-recipe/ ).

Sweet dough

Place all the cooled water roux and all the ingredients listed under sweet dough into a mixer except for the butter. Mix until all the ingredients are together, it will be very sticky.

Increase the speed to number 2 and continue to mix for 5 minutes.

Add the butter and continue the mixing until the dough is smooth and comes out of the mixing bowl, this will take approximately 15 minutes. You will notice that the dough will no longer stick to the wall of the mixing bowl.

Place the dough into a medium to large bowl. Cover and let it proof until the size double from the original size.

Now it is up to up to shape the dough as you desire…
I usually divide the dough into 2 portions and make two different bread, such as plain rolls, buns, pull-apart, cinnamon rolls, chocolate rolls, sandwich bread…make it sweet or savory, let you imagination free…

After shaping the dough, cover the dough and let it proof until double to almost triple its original size. Just before baking in a preheated oven of 350F, brush gently the top of the buns or rolls with the egg wash.

Bake for approximately 15 to 30 minutes, depending on the size and shape of the bread or until the top turn golden brown.

Remove from the oven and transfer to a wire rack.

Now it is your turn to use your imagination and come up with all kind of bread using this recipe…

If you enjoy this recipe you might want to explore my other BREAD RECIPES.

Thank you for stopping by Color Your Recipes…have a colorful week!


Chocolate Layered Buns

This is a super fun recipe for Asian inspired chocolate layered buns. Don’t be intimidated by the number of steps. The buns are soft and fluffy with many layers of chocolate in between the dough…

These buns are fun to make…it seems more complicated than actually it is…I mainly used basic bread recipe with tangzhong and layered with a chocolate paste. You can roll, twist, layer…in another words play with the dough. I made two kinds of buns/rolls with the same “materials”.

The bread dough was done by the help of a mixer, and the chocolate paste was inspired from the recipe at Cookpad.

I better stop “talking” here, because this post is pretty long and is loaded with pictures…I hope they can help you to visualize the rolling, twisting and layering…

Ingredients:

Basic Bread

Water roux or Tangzhong

  • 225 ml of water
  • 45 g of bread flour

Dough

  • 650 g bread flour
  • 150 ml heavy cream
  • 80 ml milk
  • 7 g salt
  • 50 g sugar
  • 20 g dry milk
  • 10 g yeast
  • 40 g butter

Chocolate Layer

  • 15 g bread flour
  • 10 g corn starch
  • 10 g cocoa powder
  • 50 g sugar
  • 70 ml water
  • 10 g butter

Method:

Basic Bread

Water roux
Mix flour and water in a small saucepan. Cook over low to medium heat, stirring constantly until it reaches 65C/149F. The mix will turn to a paste and you can see the bottom of the pan. Remove from heat, cover with a saran wrap film over the paste and leave until lukewarm.

Dough

In the mixer, add all the water roux, and all the other ingredients, except for the butter.

Turn the machine and stir for 2 to 3 minutes, until a ball forms.

Increase the speed to “2” and let it mix for 10 minutes. The dough will be very sticky, and less sticky as the gluten forms.

Add the butter and mix for 20 minutes more. Take a small portion of the dough (like a golf ball) and stretch gently until a very thin and transparent membrane (windowpane).
If the dough tears mix for another 5 minutes until you achieve the windowpane test. The windowpane test, demonstrated that the gluten is very well developed and it will create a very light crumb. The dough should be very elastic.

Remove the dough from the mixer and place in a bowl by covering with a plastic film.

Let dough proof until the dough tripled to its original size. While the dough is proofing, make the chocolate layer.

Knock back the dough and split into 2 portions (approximately 600 g each) and let it rest for 5 minutes on the counter.

Chocolate Layer

In a small pot, mix all the ingredients together, except for the butter.

Bring the cocoa mix in a medium heat by continuously mixing. A thick paste will form.

Remove from the heat and add the butter. Mix until all the butter is incorporated.

Spread the chocolate paste on a plastic film of about 23 x 30 cm (9 x 12 in).

Place the chocolate spread in the freezer until time to assemble the bread.

Assembly

In this post I am showing two types of buns, the first one is layered and twisted. The second one the dough is rolled and presses with chopstick. Feel free to come up with your favorite way to layer.

Example One

Roll one piece of the dough out to form a rectangle of approximately 24 x 32 cm (9 ½ x 12 ½ in).

Place the ½ of the chocolate layer in one side of the rectangle. Fold in to cover the chocolate layer.
Roll it again into its original size.

Cut into the rectangle into half and place one half on top of the second one. Roll it until the initial size. Repeat the procedure again.

Roll onto a final size of approximately 18 x 35 cm (7 x 14 in). Cut into 32 strips.

Twist 2 strips together and roll it, forming a coil. Tuck the end of the coil at the bottom.

Arrange the buns in a 20 or 23 cm (8 or 9 in) round pan.

Cover the pan with a plastic film. Leave to rise in a warm place until the buns have double in size.

Brush the buns with egg wash just before baking.

Bake in a preheated oven of 350F for approximately 25 minutes.

Serve warm or at room temperature.

Example two

Roll the remaining piece of the dough out to form a rectangle of approximately 24 x 32 cm (9 ½ x 12 ½ in).

Place the ½ chocolate layer in the middle and fold into third. Roll the dough long side and fold into thirds.

Roll the dough onto a rectangle of approximately 24 x 32 cm (9 ½ x 12 ½ in). Roll the dough up, start at the wider side (Swiss roll fashion). Press the edge together to seal.

Cut the roll into 16 pieces.

Use a chopstick, press the chopstick in the middle with the open ends on both side of the chopstick. Remove the chopstick and bring the two edges together.

Arrange the buns in a 20 or 23 cm (8 or 9 in) round pan.

Cover the pan with a plastic film. Leave to rise in a warm place until the buns have double in size.

Brush the buns with egg wash just before baking.

Bake in a preheated oven of 350F for approximately 25 minutes.

Serve warm or at room temperature.

If you enjoy this Asian Inspired recipe for Chocolate Layered Buns, you might want to check on Matcha Swirl Sandwich Bread recipe.

Thank you for stopping by Color Your Recipes…have a colorful week!