1

Simple Apple Crisp with Vanilla Ice Cream

The sensation of sweet and tangy warm apple with bits of crispy oats together with chilly creamy ice cream is just delightful…

This is a very simple recipe that can be literally place together in a blink…there is nothing exclusive in terms of ingredients…but the combination is just splendid. This dessert sure emphasizes that simple is good.

Ingredients:

Apple Filling

2 apples, peeled and cut in small pieces

1 to 2 tablespoons raisins

½ tablespoon lemon juice

1 tablespoon brown sugar

½ to ¾ teaspoon ground cinnamon

1 pinch salt

1 tablespoon corn starch

1 tablespoon butter, cold cut in small pieces

Topping

2 tablespoons all-purpose flour

2 ½ tablespoons quick oat

2 tablespoons butter, cold cut in pieces

½ teaspoon ground cinnamon

Method:

Preheat the oven to 350F.

In a medium bowl, toss together the apples, raisin, lemon juice, brown sugar, cinnamon, salt butter.  Add the corn starch and fold gently.  Divide the apple filling in 4 small baking dish and set aside.

For the topping:

In a medium bowl, mix all the ingredients together.  Use fork to mask the cold butter into the mix until large crumbs form.

Sprinkle the topping evenly over the 4 baking dish with the apples. Bake until is golden brown and bubbling on top, about 30 to 35 minutes.

Serve the apple crisps warm with vanilla ice cream.

I  hope you enjoy the simplicity of this dessert by just combining a few ingredients.

Did you know that apples are extremely rich in antioxidants and phytonutrients? Therefore apples may help reduce risks of developing heart disease, hypertension, diabetes and cancer.

Thank you for stopping by Color Your Recipes…have a colorful day!


Sourdough Starter Waffle

What you do when you have extra sourdough starter? Please do not discard the discard…you can make these waffles, they are so light and crispy!

My sourdough starter is really taking off…and it is so much fun seeing all the growth and the yeast smell mixed with the sour of the lactobacillus…what a fun thing to culture.

I got to a point that I can literally feed my sourdough starter only twice a month…even so, when this time comes, and I do not need to bake bread I feel so bad having to discard the extra starter, so I search and search to see what I could make with it…the choices are endless…so this week I decided to try the sourdough waffle.

I served these waffles with dulce de leche…the combination of the gooey dulce de leche with the light and crispy waffles with a hint of tanginess were just delightful.

The recipe calls for you to have some preparation a day before you can serve the waffles, so plan ahead. This recipe was basically originated from here with minor adjustment.

Ingredients:

  • 100 g sourdough discard
  • 50 g water
  • 50 g all-purpose flour
  • 4 tablespoons melted butter
  • 2 tablespoons sugar
  • ½ teaspoon salt
  • 1 teaspoon vanilla extract
  • 2 eggs, lightly beaten
  • ½ teaspoon baking soda

Method:

Combine the sourdough starter, water, and flour in a medium bowl. Cover and leave at room temperature on the countertop overnight.

In the morning, when ready, whisk together the eggs, melted butter, sugar, salt, vanilla, and the baking soda together.

Fold gently the egg mixture into the sourdough.

Preheat and grease a waffle iron. Pour approximately ⅓ cup of the waffle batter into the center of the iron. Close and bake until golden brown, by following the instructions of your waffle iron.

Serve warm with syrup or anything you like.

I hope you give this recipe a try in case you have extra sourdough starter…or just plan to have some extra to make these waffles.

If you enjoy this recipe you might want to check on Yeast Raised Waffle or Waffle Iron Churros.

Did you know that sourdough dough is fermented by a combination of wild yeast and lactobacillus? Lactobacillus is the bacillus used to produce yogurt, sauerkraut, cheese and other fermented food products.

Thank you for stopping by Color Your Recipes…have a colorful day!


Raindrop Cake

How can a dessert made of almost 99.8% of water be so trendy? The answer…it is all in its texture…

When I first saw these raindrop cake (which in my opinion it is not a cake per say, cake in my view should contain flour or its substitutes) I was fascinated by its shape and the notion of its pureness…upon reading the ingredients, I immediately could imagine its textures as I had worked with agar-agar, both in the kitchen and in the lab. The trick is to have the right ratio of water and agar-agar to achieve a very soft almost running gel. A little extra of agar-agar the “cake” will turn into a flavorless jelly, a little “too little” and the “cake” will not hold its shape. Therefore the amount of agar-agar is very critical.

After searching through the internet I found that the ratio of agar-agar to water varied from 0.25% to 3% meaning that in 1 cup (250ml) of water the amount of agar-agar varied from 0.625g to 7.5g…yes, you read it right…so here is where my “experiments” started…

I started with the percentage that I used to use when working in the microbiology lab, 1.5%…then went down drastically since it gave me a jelly ball so hard that I could almost throw on the floor and it would bounce back. I taper down to 0.5%, then to 0.25% (not bad) but wanted to push lower and went to 0.1% which the gel barely set…finally decided to add a bit more and went for 0.2%. Yes, it did work! My notes reminded me of my lab notebook with all the calculations since I was varying the amount of water as well. As a result of all these “experiments” I just can tell you that you have to do your own “experiment” since the consistency will depend entirely on the quality of the agar-agar you use. The nice thing is that you are literally playing with water…

When I presented raindrop cake to my husband he loved it…the “cake” melt almost instantly in your mouth, the combination of the slightly sweet, rosy aroma just give you a clean, pure, light and refreshing feeling…something that it is hard to describe, somehow stir your senses…very hard to explain…now I kind of understand the hype over this particular dessert. With this said, I think that the most important thing besides achieving the correct texture the taste should match its “clean” look…then everything comes is harmony…magical!

Instrument and Ingredients:

  • Scale, a good one
  • Water (I used filter)
  • Agar-agar
  • Sugar (optional)
  • Flavoring component, I added rosewater in this particular one, and in the future I plan to add orange blossom water, cucumber infused water, mint infused water, strawberry infused water…and my list goes on and on…

Method:

Weigh the agar-agar and place in a small pot. Add a little water until the agar-agar is totally moist. Heat the remaining water and pour over the agar-agar.

Place the water with agar-agar in the low-medium heat. Stir constantly until all the agar-agar is dissolved. Add sugar and the flavoring.

Pour into the mold and let it refrigerate for 1 hour.

Unmold the “cake” and serve with something sweet such a maple syrup, simple syrup…

I added rosewater on the agar-agar mixture once it was all dissolved and ready to be pour into the molds. Just before serving I grated a bit of pistachio (to give some color contrast) and drizzled simple syrup made with organic crystal sugar.

I hope you enjoy this fun recipe using molecular gastronomy technique…for more recipes like this please check on Honey Caviar or Coconut Panna Cotta with Mango Sphere recipes

Did you know that agar-agar was discovered in Japan? Agar-agar is a derivative from seaweed and has no calories, no sugar, no carbohydrates, no fat, and packed with fiber. Agar-agar if vegetarian and a great substitute for gelatin.

Thank you for visiting Color Your Recipes…have a colorful week!


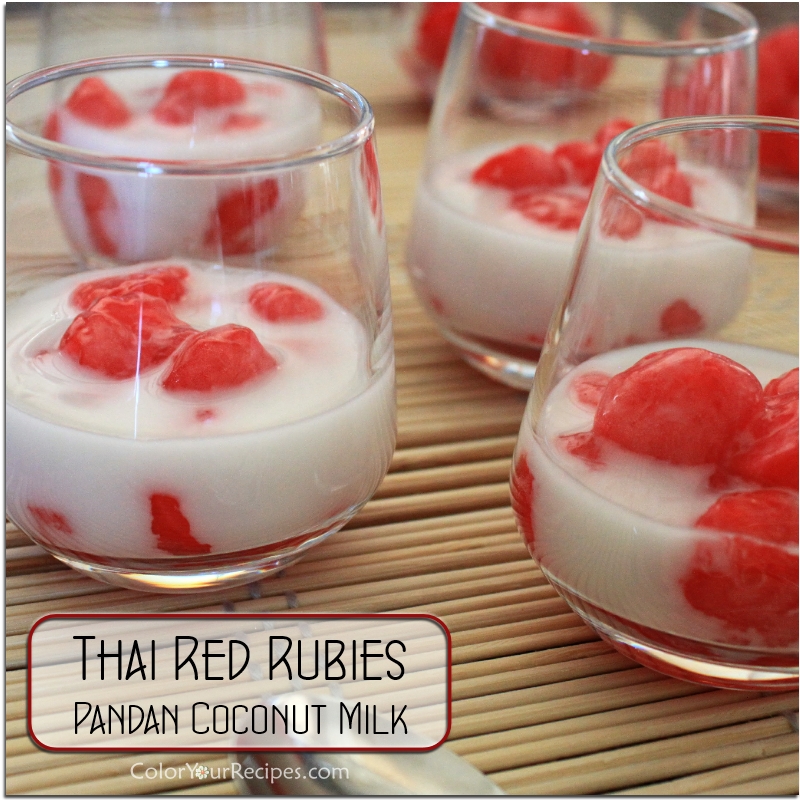
Thai Red Rubies in Pandan Coconut Milk

It is Valentine’s Day…these rubies are not to wear, but are packed with great textures, from crunchy to chewy…

Have you ever tried these Thai red “rubies”? The first time I had these “gems” was in an Asian specialty drink store…and I just felt in love with it…they are actually small pieces of water chestnuts colored in red and coated with tapioca flour…resulting in crunchy and chewy texture…I know it is hard to imagine that these little gems carry so many textures.

Another great combination is pandan with coconut milk…pandan is very popular in Southeast Asia, often used in desserts and aromatized rice dishes. If you are not familiar with pandan, you should try, as pandan leaves have a very exotic fragrance. By the way, I was able to find from leaves in Asian grocery.

Honestly I was not very fond of adding red food coloring, therefore next time making these gems I will try to use beet juice…

Ingredients:

  • ½ can coconut milk
  • 2 to 3 pandan leaves or to taste
  • 1 ½ to 2 tablespoons sugar
  • Pinch salt
  • 1 can of whole water chestnut, 8oz
  • ½ teaspoon red food coloring
  • ¼ cup water
  • ½ cup tapioca flour

Method:

Pandan coconut milk

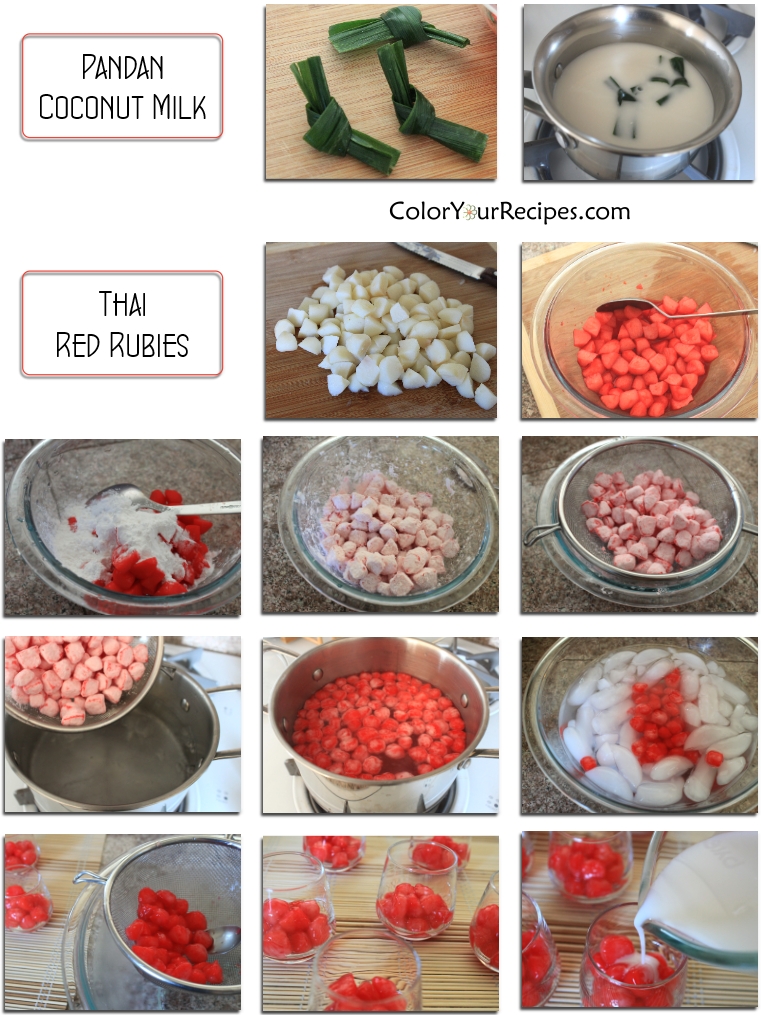
Place the coconut milk in a small pan, add salt and sugar. Heat under medium heat, when the milk is about to boil, turn the heat to simmer and add the pandan leaves, let it simmer for about 5 to 10 minutes.

Remove from the heat and let it cool, and place in the refrigerator to chill.

Red rubies

Drain the water chestnut and rinse. Cut them into small bite size pieces (about 6 pieces each chestnut).

In a small bowl add the red food coloring to the water and soak the water chestnuts for about 15 minutes.

Once the water chestnuts are colored, drain the colored red water.

Place the “rubies” in a bowl and toss the tapioca flour to coat, make sure that all the “rubies” are well coated with tapioca flour.

Remove the excess of tapioca flour by placing the coated “rubies” into a strainer.

In a medium pot, boil about 4 to 5 cups of water. When boiling, place the coated “rubies” in, and cook for a few minutes until they float. Scoop the “rubies” in a strainer and place them in ice water.

Assembly

Remove the “rubies” from the ice water and scoop the desired amount into small serving cups. Add the pandan coconut milk as you like and serve icy cold.

Note:If you like a thicker layer of chewy tapioca, spray water on the already coated “rubies” and coat them again with more tapioca flour…

I hope you enjoy this colorful and fun dessert inspired by Thai cuisine.

Did you know that water chestnuts is not a nut? Water chestnuts are aquatic vegetables, meaning that they grow under the water in marshes. Water chestnuts are low in calories and rich in dietary fiber and have good amounts of vitamins and minerals.

Thank you for visiting Color Your Recipes…have a colorful week!


Carrot Cake with Avocado Oil and Flaxseed

This is a healthy recipe for carrot cake based on the traditional one using flaxseed meal and avocado oil. It is so good that you will not be able to tell that all these ingredients are hidden in the cake.

We love carrot cake, especially when there is a layer of cream cheese frosting…a thin layer of cream cheese frosting is all we need, this way it will not take all the credit from the carrot cake.

Well, this recipe has a few “healthy” ingredients without compromising the taste and the texture of the cake…avocado oil and flaxseed meal.

Like all the carrot cakes, this is a pretty simple and straight forward recipe. I always like to have this cake available in the freezer, and usually in small individual serving. It is great to be able to enjoy a slice of carrot cake whenever we feel like. This is a great and simple recipe than can be made way ahead of time. It is so nice to have a slice of homemade carrot cake whenever you feel like, especially during holidays when unannounced friends and family drop by for a quick visit you can easily defrost and serve the carrot cake with a cup of coffee or tea…so comforting!

Ingredients:

Carrot Cake

  • 2 extra large eggs (approximately 144 g)
  • 100 g sugar
  • 50 g brown sugar
  • 1 teaspoon vanilla extract
  • 50 g butter, melted
  • 100 g avocado oil
  • 110 g all-purpose flour
  • 20 g flaxseed meal
  • 1 teaspoon baking soda
  • 1 teaspoon baking powder
  • ½ teaspoon salt
  • 1 teaspoon cinnamon
  • ½ teaspoon nutmeg
  • Pinch all-spice, ground
  • ½ lb grated carrot, 220 g
  • ½ cup diced/chopped toasted pecan, 60g
  • 4 oz crushed pineapple, drained, all the liquid squeezed, 120 g

Cream Cheese Frosting

  • 4 oz cream cheese, room temperature
  • 3 tablespoons butter, room temperature
  • ½ teaspoon vanilla extract
  • ½ cup confectioner’s sugar

Method:

Carrot Cake

Preheat oven to 350F.

In a medium bowl shift together flour, flaxseed meal, salt, baking soda, baking powder, baking soda, nutmeg, all-spice and cinnamon.

In the mixing bowl blend together avocado oil, butter and the sugars. Add the eggs one at the time beating well until blended.

Add the flour mixture to the oil and egg batter. Mix until all the flour is well incorporated.

Fold in the batter the carrot, pineapple and the nuts.
Pour the batter into 8 x8 inch square pan. Bake in a preheated oven at 350F for 45 to 50 minutes, or until a toothpick inserted in the center of the cake comes out clean.

Cool the cake completely before spreading the cream cheese frosting.

Cream Cheese Frosting

In a medium bowl, mix cream cheese with the butter and the vanilla extract until smooth and creamy.

Add the confectionary sugar to the mixture, until all the sugar is well incorporated to the cream.

Spread a layer of the cream cheese on the carrot cake.

Refrigerate and serve. I cut the cake into small pieces and stored in the freezer. When ready to serve just let it defrost in the refrigerator overnight or at room temperature for ½ hour.

Now…tell me if you can resist this…

I hope you enjoy this easy and simple carrot cake recipe…for more dessert recipes, please check HERE.

Did you know that avocado oil has a very high smoke point? Due to the high smoke point avocado oil is good to use in frying food. The slightly greenish color of the avocado oil is due to high levels of chlorophylls and carotenoid.

Thank you for visiting Color Your Recipes…have a colorful week!


Pumpkin Cream Cheese Cake

Looking for a light and fluffy pumpkin cheesecake?  This is all you need, Asian inspired cheesecake, it is more a cake than cheese.

Well, this is the thing…I did not know how to call this cheesecake like dessert…looks like a cake, but has cream cheese in it, and it resembles the cotton soft cheesecake with all the rights of a pumpkin pie…color and spice…this cake/cheesecake is so light, cottony and melt in your mouth. And you know what? It tastes much, much better next day after in the refrigerator for 12 to 24 hours.

So if you like all pumpkin stuff, get ready for a treat…this is much lighter than your conventional cheesecake and I must tell you that you will not be content with one slice…

Ingredients:

  • 50 granulated sugar
  • 3 eggs separated
  • ⅛ teaspoon cream of tartar
  • 10 g unsalted butter
  • 80 g cream cheese
  • 50 g milk
  • 50 g pumpkin puree (I used Trader Joe’s)
  • 20 g cake flour or pastry flour
  • 15 g cornstarch
  • ½ teaspoon pumpkin spice (I used Trader Joe’s)
  • Pinch salt

Method:

Line a 6 inch pan with parchment paper. To make it easy for the parchment paper to stick on the baking pan, coat the pan with a little butter before. If using a spring-form pan, wrap the bottom of the pan with a couple of sheets of aluminum foil to prevent the water into the pan when baking.

Preheat the oven at 315F (or lower at 300F…see method)

Sift the flour, cornstarch, salt and pumpkin spice.

In a double boiler place the cream cheese, butter and milk and pumpkin puree. Make sure that all the ingredients are melted and even. Remove from the heat and let it cool a bit. Add egg yolk one at the time, mixing after each addition. Fold in the flour mixture and mix well.

Make the meringue by whisking egg whites with cream of tartar until foamy. Add in the sugar and whisk until stiff peaks form.

Take ⅓ of the meringue and fold into the cheese/pumpkin mixture, once incorporated fold in another ⅓ of meringue, and finally the last ⅓ of it. Fold gently preventing the air bubbles from breaking.

Pour the mixture into the prepared round cake pan.

Bake the cheesecake in a water bath for 30 minutes at 315F and then lower the temperature to 300 and bake for another 45 minutes or until set and golden brown. You might want to decrease the starting temperature to 300F to avoid the cake to “crack” and then to 285F.

Leave the cake to cool down in the oven with the oven door open, about ⅛ hour, this might prevent the cake to shrink due to the drastic change in temperature.

Refrigerate the cake before serving.

Did you know that pumpkin is a fruit? Because pumpkin like all the other squashes develop from a flower therefore according to botanist pumpkin as a fruit with seeds in it.

Thank you for visiting Color Your Recipes…have a colorful week!


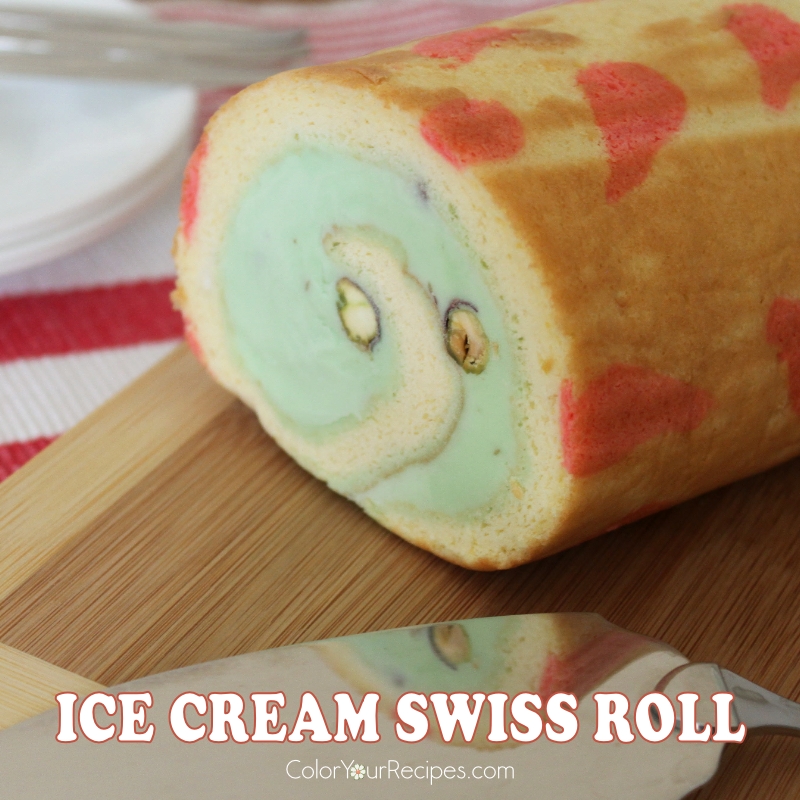
Ice Cream Swiss Roll

Can you find a better combination than ice cream and cake? Well, in this Swiss roll ice cream cake you have them both, all in one bite.

This is a fun Swiss roll, especially during the hot weather. And the best part of it, is that you can prepare way in advance and store in the freezer until you are ready to serve.

The recipe is super easy…just use a simple sponge cake batter…and instead of cream, fruit for the filling, I simply filled with ice cream…the choices in regards to flavors are countless…chocolate, vanilla, strawberry, coconut, lemon…you can mix and match any kind of flavor for the sponge cake with any flavor of ice cream…it is up to you to color it the way you want…

Ingredients:

  • 3 eggs, separated
  • 55 g cake flour
  • ¼ teaspoon baking powder
  • Pinch of salt
  • 30 g vegetable oil, I used avocado oil
  • 30 g milk
  • 1 tsp vanilla extract
  • 50 g sugar
  • Ice cream of your choice ( I used pistachio)

Method:

Have handy two 9 x 13 inch or 23 x 28cm baking trays, line one with parchment paper. To avoid the paper slipping, brush some butter on the try to “stick” the paper.

Preheat oven to 350F.

Mix together the flour, baking powder, salt and set aside.

In a large bowl whisk egg white to foamy and add sugar, continue to whisk the egg white at medium speed to form to stiff peaks. Do not over beat, as the egg white should still remain very shiny.

In another large bowl, mix egg yolks, vanilla extract, sugar, cooking oil and fresh milk together until a light pale yellow forms and the mixture is slightly thicken.

Combine the flour mixture to the egg mix. Mix gently until all the flour is well incorporated.

Fold the egg whites into the egg yolk/flour mix in 3 portions. Fold well with a spatula after each addition of egg white. Do not over mix.

Take out about 1 ½ to 2 tablespoons of the cake batter and add 1 drop of red coloring liquid. Mix and pipe dots on the baking tray, with the help of a wooden toothpick, design your pattern by placing the tip of the stick in the middle of the dot and dragging outwards.

Place the tray in the preheated oven for about 1 minute. Transfer the parchment paper to other tray.

Pour the remaining batter onto the patterned tray. Make sure to spread the batter evenly with the spatula. Gently tap the try on the table top to remove large air bubble trapped in the batter during mixing.

Place the tray in the oven and bake for approximately 10 minutes at 350F and then turn down the temperature to 325F and bake for another 5 minutes.

Remove the desired ice cream from the freezer and let it sit at room temperature for about 5 minutes.

When done baking, remove the cake from the tray and transfer onto a wire rack to cool. After cooling, flip the cake onto a plastic sheet.

Spoon the ice cream on the sponge cake. Spread evenly throughout the cake and gently roll up to make a Swiss roll.

Wrap with the plastic sheet and place the roll in the freezer for a couple of hours.

When it is time to serve, remove the Ice cream Swiss roll from the freezer, slice accordingly to the thickness you desire and let it sit for a couple of minutes at room temperature.

Thank you for visiting Color Your Recipes…have a colorful week!


Crepe Cake or Mille Crepe

Although this is dessert resemble a cake it is not a real cake.  The “cake” is made of layers of crepe in between pastry creme.

Crepe cake or mille crepe…is originated in France and yes, this crepe cake requires a labor of love…in reality it is very simple and you will not have the issue of the cake not rising of collapsing…

The intense hands on are mainly when cooking the crepes one by one…and making sure that they do not tear up. I patted myself on the shoulder when cooking the crepes, somehow, from the very first to the very last crepe, they all came out intact…phew! I gave myself some room for error, since there was none, the crepe cake was made of exactly 23 layers…I was “wow”, that is cool!

This recipe was mainly from here, with some minor change. I cut the crepe batter recipe in half but kept the cream the same…the leftover cream can be served with fresh fruits, as a filling for cream puffs or pavlova…you will not have any problem using the cream. Since I love a touch of rose, I added a little rose water when whipping the heavy cream…

The day before assembling the crepe cake prepare the following:

Crepe Batter

  • 3 tablespoons butter
  • 1 ½ cups milk
  • 3 eggs
  • 90 g all-purpose flour
  • 3 tablespoons sugar
  • Pinch salt

Melt the butter in a small pan until lightly browned remove immediately from heat and set aside.

In another small pan, warm the milk until steaming, remove from heat and set aside to cool slightly.

In a medium bowl using hand mixer at a low speed, mix together the eggs, flour, sugar, and salt. Slowly add in the warm milk and browned butter. Cover the bowl and refrigerate overnight.

Pastry Crème

1 egg
1 tablespoon all-purpose flour
2 tablespoons sugar
1 tablespoon cornstarch
1 cup milk
1 teaspoon vanilla extract

In a small bowl, add egg, flour, sugar, and cornstarch, mix well until a smooth paste forms.

In a saucepan over low heat, bring milk almost to a boil and slowly whisk the milk into the egg mixture. Return all ingredients to the saucepan, over low-medium heat, cook until the cream has thicken, by stirring constantly stirring. Make sure that the cream boils.

Remove from the heat and add vanilla extract .Set aside and cover with a plastic film to cool.When the cream has cooled refrigerate overnight.

On the day of assembling the cake:

Remove the crepe batter from the refrigerator and bring to room temperature.

Set two large flat plates aside to layer the crepes.

In a 6 ½ inch lightly oiled nonstick pan over medium-low heat pour ⅛ cup of crepe better, swirl to cover the pan surface. Cook until the batter has settle and becomes lightly browned. Gently using a spatula turn the crepe over and continue cooking until the other side is lightly browned as well. Remove the crepe and set on the plate. Make sure to not stack the crepes on top of each other. I alternate the crepes on the two flat plates.

Repeat the process until all the batter is gone (I was able to make exactly 23 crepes).

Rose water infused whipped cream

2 cups heavy cream
1 tablespoon sugar
1 teaspoon rose water

In a large bowl whip the heavy cream with the sugar and rose water. Fold gently the prepared chilled pastry cream with the whipped cream.

Assembly of crepe cake

Place one prepared crepe on a large cake plate.

With a spatula cover the crepe with a thin layer of the pastry cream mixture.

Cover with another dry crepe and repeat covering with the pastry crème until you have used up all the crepes (23 layers). Do not cover with cream the last layer of crepe.

Refrigerate the prepared cake for a minimum of 2 hours or overnight. Before serving remove the cake from the refrigerator. Garnish with fresh fruits, compotes, jams or dust with powdered sugar.

Slice and serve.

Did you know that in many countries, crepes are also known as pancakes? Crepes varies from sweet to savory.


Thank you for visiting Color Your Recipes…have a colorful week!


Oladi, Russian Pancake

This is a very simple recipe of a Russian version of what is our pancake.  The recipe calls for yeast as an raising agent.  It is fluffy and light, great for breakfast.

I hope this post find you all well…as for us, we came back from a fantastic vacation. We explored Russia, from Moscow to St. Petersburg by cruising the Volga river and stopping at many cities along the way. It was a very nice experience visiting all the major touristic places…the churches, museums, parks, metro system and many others.

After our vacation in Russia it is only natural to share a Russian recipe…and I choose this Russian pancakes, called oladi, which was served to us very often for breakfast as well as with caviar. What I found unique about these pancakes is mainly the texture…they are not fluffy like cake and reminds me a little of English muffins…slightly chewy with different size of air pockets. No need to mention that I love it and as soon as I came home, I had to try to make them. These little pancakes can be served with anything from sweet to savory, such as jam, fresh fruit, cream cheese, sour cream, smoked salmon, caviar…you name it. Moreover, like pancakes, you can add all kind of stuff in the dough/batter, such as chocolate chips, fresh fruits, nuts…again, color it the way you like. This recipe has been adapted from here.

Ingredients:

  • 1 cup of warm milk
  • 1 teaspoon active dry yeast
  • 175 g bread flour or all-purpose flour
  • 2 tablespoons sugar
  • Pinch of salt
  • 2 tablespoons melted butter
  • 1 egg slightly beaten
  • Vegetable oil or butter for cooking the pancakes

Method:

In a medium bowl add the yeast to the milk and let it sit for 5 to 10 minutes. Add flour and mix it well, until all the flour is incorporated to the milk.

Cover the bowl with plastic wrap and let rise in a warm place until the dough doubles from its original size, 30 minutes of more depending of the room temperature

Once the dough has doubled add the sugar, salt, melted butter and egg. Mix thoroughly until all the ingredients are incorporated.

Cover and let it rise again until the dough doubles.

When ready to cook, in a skillet add a little of vegetable oil or butter (or combination of both) on medium heat.

Spoon the dough onto the skillet and cook on one side until golden then flip the pancake over until the other side is golden brown.

Serve warm.

Thank you for visiting Color Your Recipes…have a colorful week!