Merry Christmas and a Very Happy New Year!


Have you ever tried these Thai red “rubies”? The first time I had these “gems” was in an Asian specialty drink store…and I just felt in love with it…they are actually small pieces of water chestnuts colored in red and coated with tapioca flour…resulting in crunchy and chewy texture…I know it is hard to imagine that these little gems carry so many textures.
Another great combination is pandan with coconut milk…pandan is very popular in Southeast Asia, often used in desserts and aromatized rice dishes. If you are not familiar with pandan, you should try, as pandan leaves have a very exotic fragrance. By the way, I was able to find from leaves in Asian grocery.
Honestly I was not very fond of adding red food coloring, therefore next time making these gems I will try to use beet juice…
Ingredients:
Method:
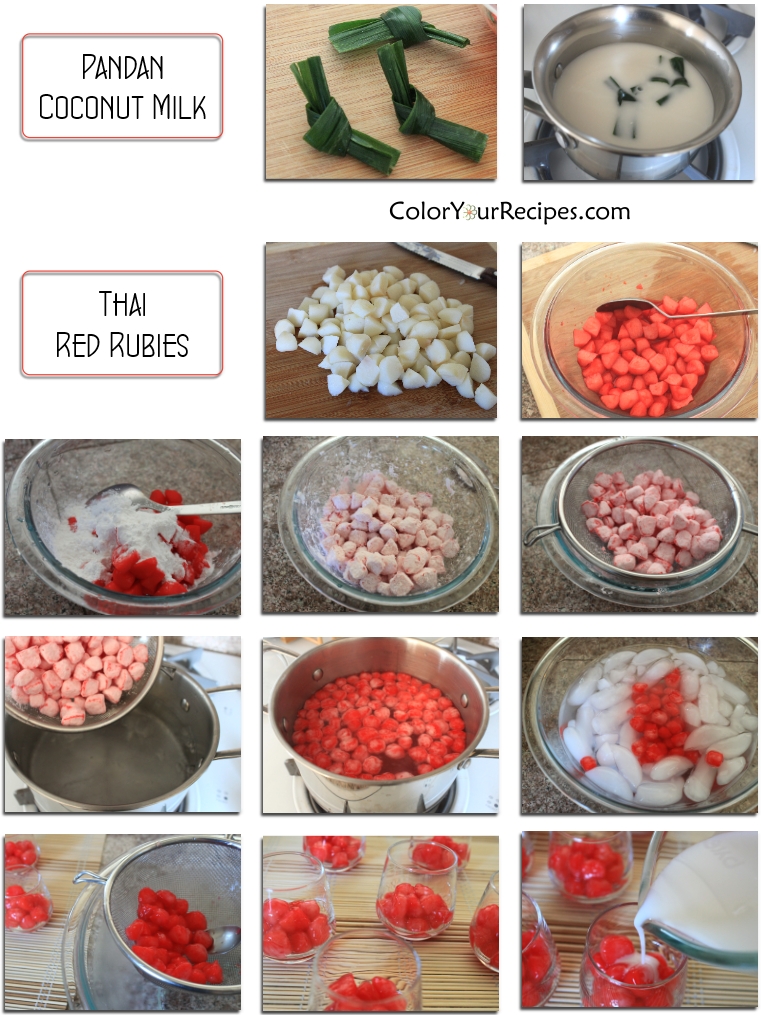
Pandan coconut milk
Place the coconut milk in a small pan, add salt and sugar. Heat under medium heat, when the milk is about to boil, turn the heat to simmer and add the pandan leaves, let it simmer for about 5 to 10 minutes.
Remove from the heat and let it cool, and place in the refrigerator to chill.
Red rubies
Drain the water chestnut and rinse. Cut them into small bite size pieces (about 6 pieces each chestnut).
In a small bowl add the red food coloring to the water and soak the water chestnuts for about 15 minutes.
Once the water chestnuts are colored, drain the colored red water.
Place the “rubies” in a bowl and toss the tapioca flour to coat, make sure that all the “rubies” are well coated with tapioca flour.
Remove the excess of tapioca flour by placing the coated “rubies” into a strainer.
In a medium pot, boil about 4 to 5 cups of water. When boiling, place the coated “rubies” in, and cook for a few minutes until they float. Scoop the “rubies” in a strainer and place them in ice water.
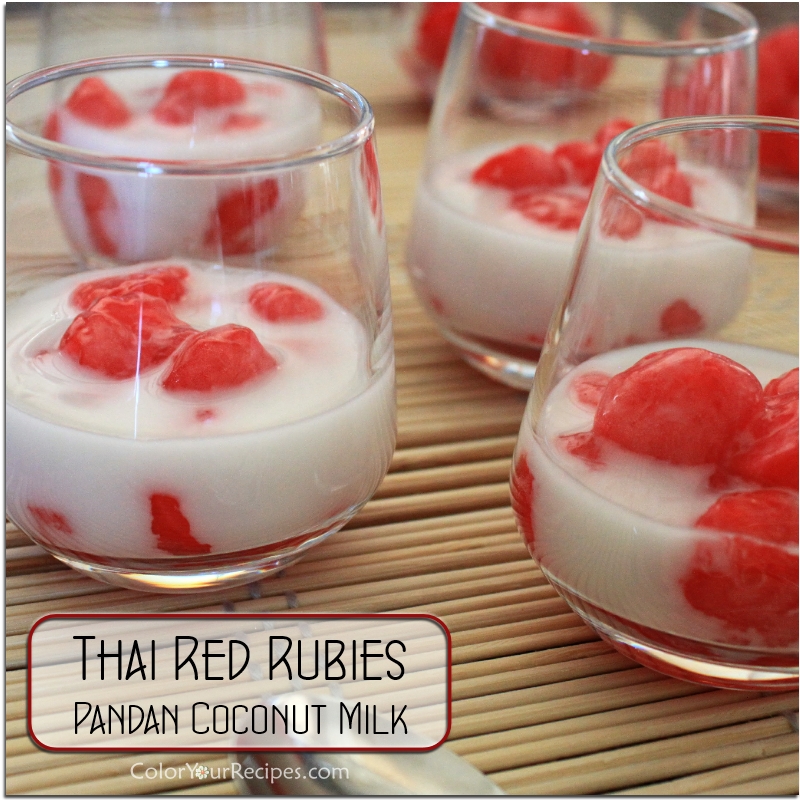
Assembly
Remove the “rubies” from the ice water and scoop the desired amount into small serving cups. Add the pandan coconut milk as you like and serve icy cold.
Note:If you like a thicker layer of chewy tapioca, spray water on the already coated “rubies” and coat them again with more tapioca flour…
I hope you enjoy this colorful and fun dessert inspired by Thai cuisine.
 Did you know that water chestnuts is not a nut? Water chestnuts are aquatic vegetables, meaning that they grow under the water in marshes. Water chestnuts are low in calories and rich in dietary fiber and have good amounts of vitamins and minerals.
![]()


Before you ask…yes, this is another molecular gastronomy recipe. The technique I used is called “reverse spherification”, and was based on Surprise Bubbles.
The fascinating thing is that this technique is so simple that these colored bubbles were mainly made by my niece and nephew, 14 and 11 years old…
They had so much fun making and then eating these popping bubbles filled with grape juice…more specifically white grape juice. Initially we started with the non-color ones (original color of the white grape juice). Since it was kind of hard to see and manipulate the translucent bubbles, we decided to color them by adding a few drops of food coloring into the alginate solution. Erica chose red and Nick blue…and off we went, each one with their bowls of colored alginate bath and water…I played with the non-color ones.
They first removed the frozen half sphere from the freezer and dropped in the alginate bath for 3 minutes. Then they scooped the bubbles from the alginate bath and placed them into a bowl of water to remove the excess alginate. After “collecting” lots of bubbles we just ate by “popping” one at the time in our mouth…a very fun experience, especially because these bubbles were like 0.3oz size and you sure feel the bubble exploding in your mouth and the refreshing juice.
Ingredients:
½ cup white grape juice or any juice of your preference
1 teaspoon sugar
½ teaspoon calcium lactate
400 ml of filtered water
2 g sodium alginate


Method:
Prepare the alginate bath by mixing the sodium alginate in water, until the sodium alginate is totally dissolved. You can use an immersion blender. Once the sodium alginate is dissolved, let the solution rest in the refrigerator for approximately 24 hours or until all the air bubbles disappear.
A few hours (or 24 hours) before the spherification, mix the grape juice with sugar and calcium until the calcium is dissolved. Carefully spoon in a silicon mold and freeze.
Drop the frozen juice in the alginate bath and let it sit for 3 minutes.
Scoop the bubbles using a slotted spoon and rinse them in a bowl of water.
Remove from the water and they are ready to be served.


If you enjoy this Molecular Gastronomy recipe you might want to check on Spherical Yogurt or Honey Caviar.

Did you know that “spherification” is simply a gelling reaction between calcium and alginate which is a gum like substance removed from brown seaweed. So by adding calcium, we just replace what the manufacturers removed from the seaweed, therefore the gelling texture.

When I bought the can of pumpkin from Trader Joe’s, I had no idea what I wanted to use the can for…I just knew that I wanted to make something using pumpkin…after all, it is Fall and Halloween is around the corner.
After many thoughts…why not pumpkin buns using the water roux method? But what do to with the remaining of the pumpkin? Why not fill the buns with it? So this was the end of my quest…pumpkin buns filled with pumpkin. In the middle of the baking, I decided to try and make some rolls as well, like the cinnamon rolls, using the pumpkin filling…
The buns and rolls came out delicious, the combination of the soft and pillowy bread with the creamy pumpkin filling was just perfect.
Ingredients:
Water roux or Tangzhong
15 g bread flour
75 ml water
Dough
1 ½ cup bread flour
¾ teaspoon salt
2 tablespoons sugar
2 tablespoons dry milk
1 ½ tablespoons butter
1 ½ teaspoons yeast
1 egg
½ cup mashed pumpkin
1 teaspoon pumpkin spice
Water as needed
Pumpkin filling
1 can of pumpkin minus the ½ cup (used in the dough)
3 to 4 tablespoons brown sugar
1 teaspoon pumpkins spice
2 tablespoons fresh milk
Egg wash
Poppy seeds


Method:
Water roux
In a small pan, mix all the ingredients of water roux, place in low heat and stir constantly until the temperature reaches 65oC (150F), or if you do not have a thermometer, cook until ripples form. Set aside to cool by covering with a plastic film.
Dough
In the bread machine bucket, add the water roux, and all the other ingredients listed under “dough”, except for the butter.
Turn the machine to knead mode until it forms soft dough, add more water if needed. Add the butter and let it knead until the butter incorporates to the dough.
Remove the dough and place in a bowl by covering with a plastic film.
Let both dough proof until the dough doubles to its original size. In the meantime prepare the pumpkin filling by mixing all the ingredients in a medium bowl.
Knock back the dough and split into 2 balls and let it rest for 5 minutes on the counter.
Flatten one of the balls and shape like a Swiss roll, place half of the filling and roll it like a Swiss roll. Cut in 8 equal size and place in a pan, cover the pan with a plastic film until it sizes double.
With the other half ball, split into 8 small portions. Flatten the dough with the roller pin and with your fingers until a disk. Place some filling in the middle of the disk and seal it with all the filling in it. Place the filled buns on the tray, cover with a plastic film and let them rest until their sizes double.
When ready to bake, with a sharp scissor make cuts on the side of the buns and brush the top of the buns with the egg wash and sprinkle some poppy seeds on it.
In a preheated oven of 350 bake the buns and rolls for approximately 25 minutes or until golden brown
Remove from the oven and cool the buns/rolls on a wire rack.


If you enjoy this pumpkin buns using water roux method, you might want to check on Simple Pumpkin Cupcakes or Pumpkin Cookies for recipe using pumpkin.
 Did you know that pumpkin is very rich in dietary fiber? Moreover, due to its high content in antioxidants, minerals and vitamins is one of the food item that is recommended by dieticians for cholesterol and weight controlling program.


I am so excited to share with you the first dessert that I made from “Flour”, a cookbook published by Joanne Chang…she is amazing, after getting a degree in applied mathematics and economic from Harvard she decided to pursue culinary. You can find all the details about her on her book which I read with amazement. The cookbook is easy to read and most importantly, it is easy to follow.
Since I was not sure what was the proper way to post a recipe from a book, I contacted Joanne and she personally assured me that I could post her recipe.
These coconut macaroons are delicious and as described in the book “chewy, sweet, soft, crispy…”, and they taste exactly as she described. The center of these macaroons are soft, creamy…yum! I do not have words to tell you how delightful these treats are and believe me they are so simple to make…really, the recipe is so simple that they can make you feel guilty.
Anyway, enough talk and let’s move to the important part…the recipe!
Ingredients:
Pastry Cream
½ cup milk
3 tablespoons
2 tablespoons cake flour
1 pinch kosher salt
2 egg yolks
½ teaspoon vanilla extract
2-14 ounces bags of sweetened shredded coconut
6 egg whites
¾ cup sugar
1 pinch kosher salt


Preparation:
Mix the cake flour with the sugar and the salt. Add this mixture to the egg yolks.
Scald the milk until almost boiling (do not boil).
Add the scalded milk to the egg yolk mix a little at the time, whisking constantly.
Return the milk and yolk mix to the stove over medium heat, whisking continuously and vigorously until the mixture thickens and boils. Remove from the heat and add the vanilla extract.
Cover the cream with a plastic wrap, placing it on top of the cream and let it cool completely.
Preheat the oven at 350F and prepare the baking sheet, by placing a parchment paper (I used silicone mat).
In a large bowl, combine the coconut, egg white, sugar salt and the pastry cream. Stir all together until well combined. You can then refrigerate the dough at this stage if needed for up to 5 days.
Scoop approximately 1 tablespoon of the dough into the prepared baking sheet.
Bake for 20 to 25 minutes or until the cookies are golden brown. Let the cookies cool on the baking sheet for approximately 20 minutes and then transfer to the wire rack to cool completely.
The macaroons can be stored in an airtight container at room temperature for up to 3 days, most likely will not last for 3 days.

